3D Autonomous Vehicle Grounding Post-Training with Cosmos Reason 1 & 2
Authors: Amol Fasale • Jingyi Jin Organization: NVIDIA
| Model | Workload | Use Case |
|---|---|---|
| Cosmos Reason 1 | Post-training | 3D vehicle grounding in autonomous driving scenarios |
| Cosmos Reason 2 | Post-training | 3D vehicle grounding in autonomous driving scenarios |
Overview
3D vehicle grounding is a computer vision task that enables autonomous vehicles to detect and precisely localize surrounding vehicles in three-dimensional space from camera images. Unlike traditional 2D object detection, which only identifies objects within the image plane, 3D grounding provides complete spatial information including each vehicle's position (x, y, z coordinates), dimensions (length, width, height), and orientation (roll, pitch, yaw angles) in the real world. This comprehensive 3D understanding is essential for autonomous driving systems, enabling accurate path planning, collision avoidance, and safe navigation by allowing vehicles to reason about spatial relationships and predict future trajectories of surrounding objects.
Input and Expected Output After Post-Training
The following example demonstrates the expected input and output of a fine-tuned model performing 3D vehicle grounding after post-training. This shows what a fine-tuned model can achieve: taking an autonomous vehicle camera image as input and producing accurate 3D bounding box coordinates as output.
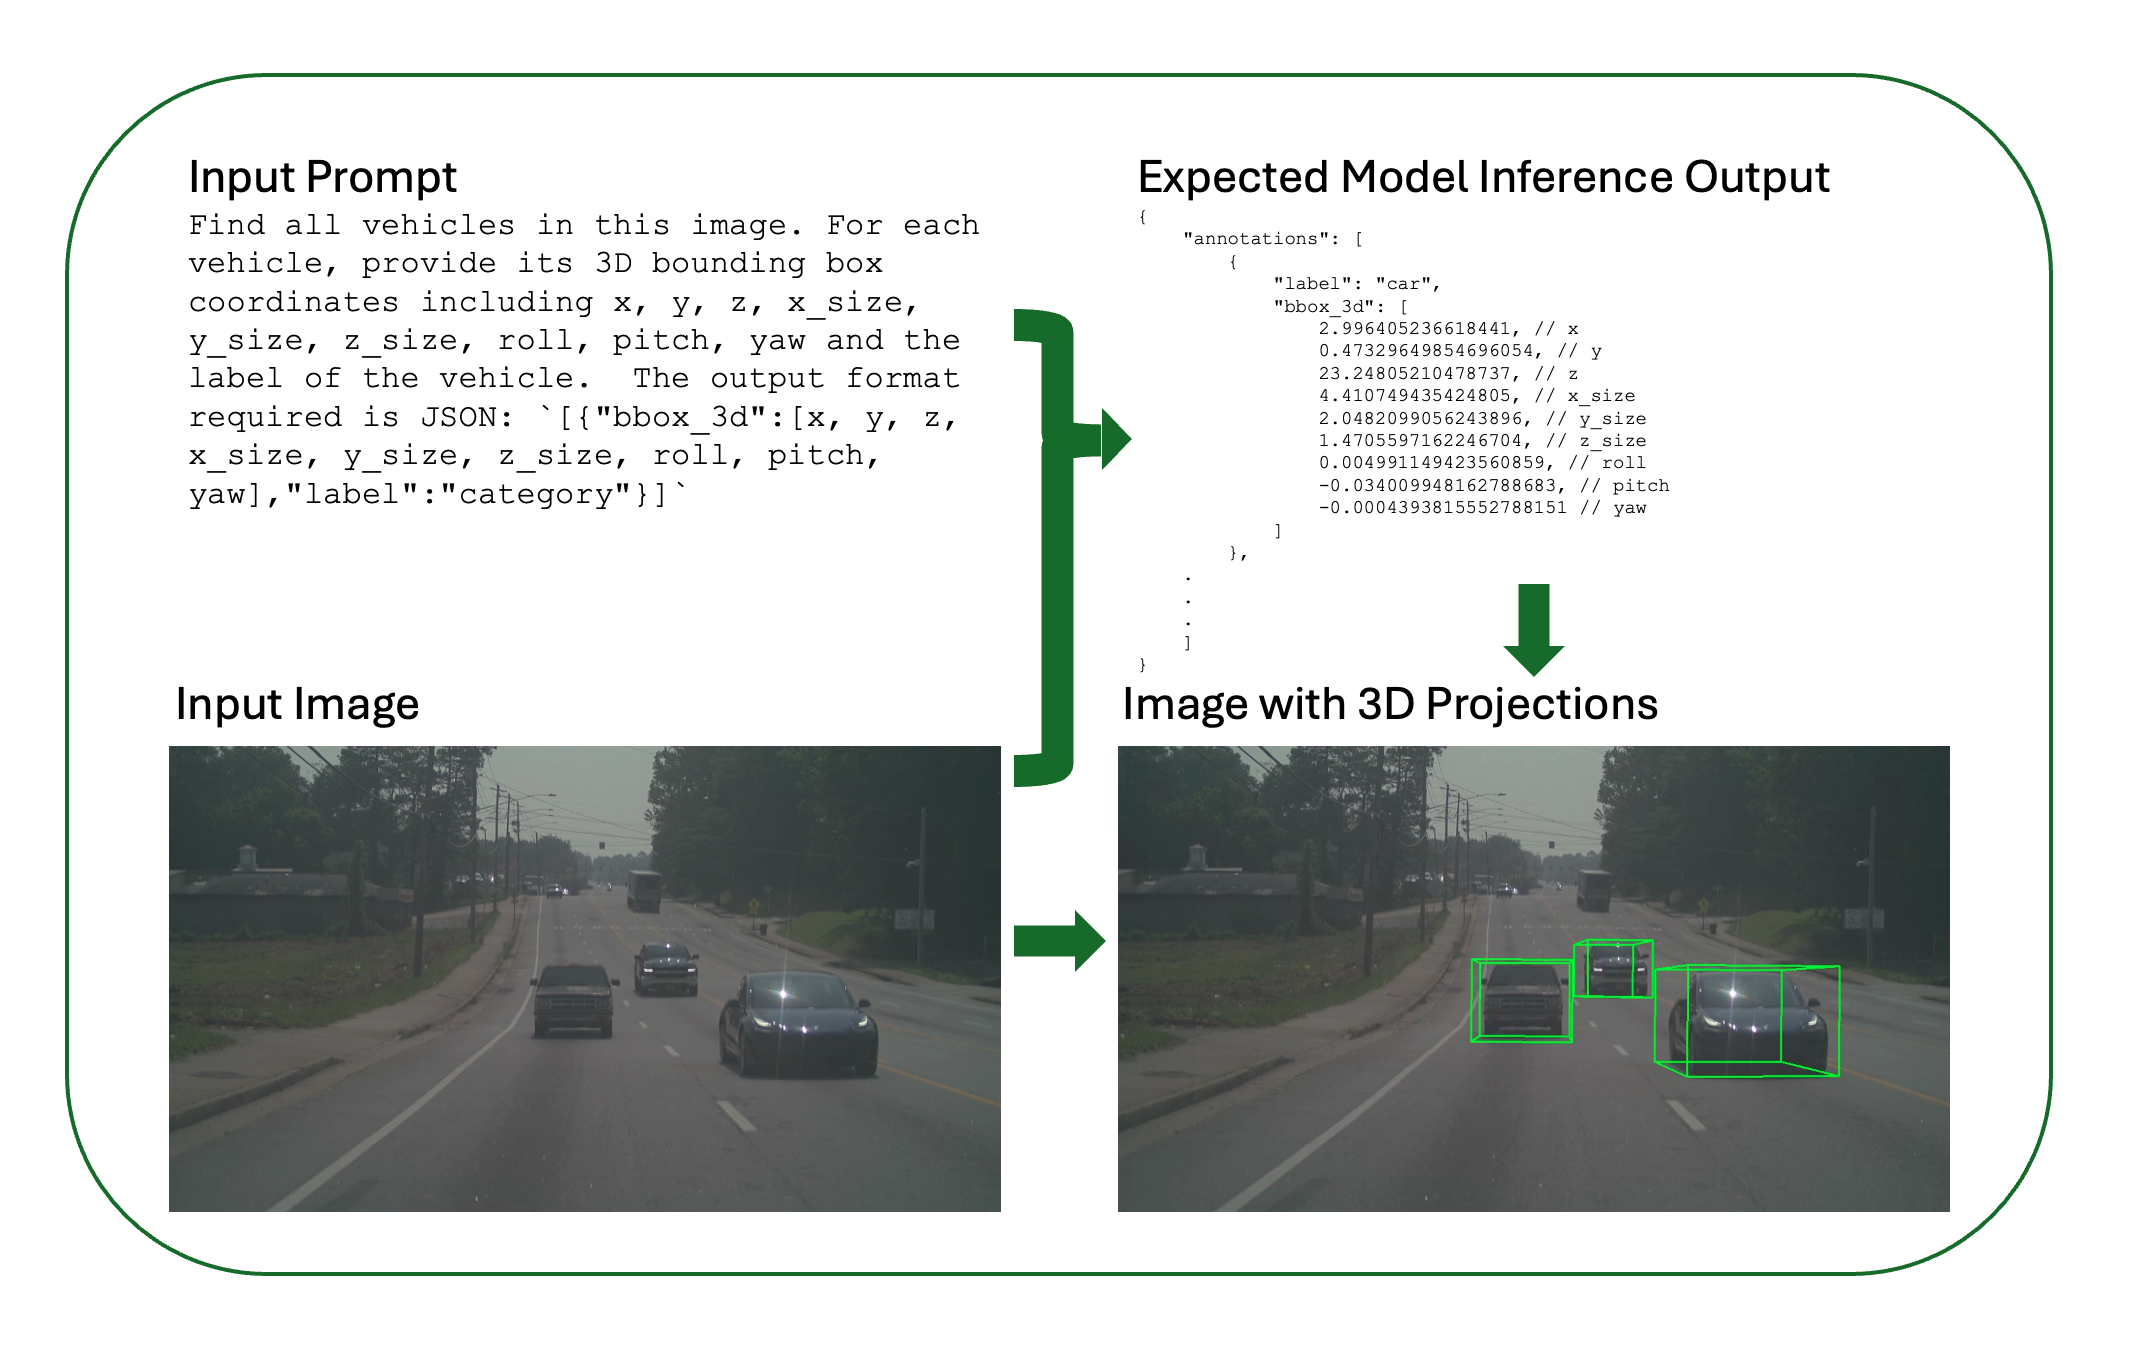
Figure: Input-output workflow for 3D vehicle grounding. The model takes a text prompt and camera image as input and predicts 3D bounding boxes for detected vehicles and it also shows the visualization of predicted 3d coordinates.
The expected output includes an annotations array of detected vehicles, each with label (vehicle category: car, truck, bus, etc.) and bbox_3d (9 values: x, y, z, x_size, y_size, z_size, roll, pitch, yaw). The raw 3D bounding box coordinates are projected back onto the 2D image plane for visualization using camera parameters (intrinsics), so the output image shows multiple detected vehicles, their 3D bounding box projections on the image, and accurate 3D spatial localization.
In this recipe, we demonstrate how to fine-tune both Cosmos Reason 1-7B and Cosmos Reason 2-8B models for 3D vehicle grounding tasks using supervised fine-tuning (SFT). Both models can be trained using two different frameworks:
- Cosmos-RL: An async post-training framework specialized for SFT and RLHF, supporting both Cosmos Reason 1 and Cosmos Reason 2
- Qwen-Finetune: A fine-tuning framework based on Qwen-VL, supporting Cosmos Reason 2
Both models learn to predict precise 3D bounding box parameters including:
- Position: x, y, z coordinates
- Dimensions: x_size, y_size, z_size
- Orientation: roll, pitch, yaw angles
- Category: Vehicle label (car, truck, bus, etc.)
This fine-tuning process adapts the general-purpose reasoning model to the specific requirements of autonomous vehicle perception, improving its accuracy in predicting 3D spatial relationships from 2D visual inputs.
Data Curation
Disclaimer: The dataset used in this recipe is not released publicly. This recipe describes the dataset format, structure, and curation pipeline so you can understand what the data looks like. If you have access to similar autonomous driving data (e.g., multi-camera video with 3D annotations or the ability to generate them), you can use your own data to follow this workflow. This recipe is intended as inspiration and a technical reference for 3D vehicle grounding post-training.
The training dataset is curated from the MADS (RDS-HQ) dataset, which contains 5,500+ autonomous vehicle video driving sequences, each with 5 camera views (front, front-left, front-right, rear-left, rear-right). This rich dataset provides comprehensive multi-view coverage of driving scenarios, enabling robust 3D perception training.
The MADS dataset is a comprehensive autonomous driving dataset that includes multiple data modalities and attributes:
- Video Data: Multi-camera video sequences capturing driving scenarios from different viewpoints
- 3D Annotations: Detailed 3D bounding box annotations for vehicles and other objects
- LiDAR Data: Point cloud data providing precise 3D spatial information
- Labels: Object labels and semantic segmentation data
- Camera Calibration: Intrinsic and extrinsic camera parameters for accurate projection
- Ego Vehicle Poses: Vehicle position and orientation data over time
- Scene Metadata: Additional contextual information about driving scenarios
For this 3D vehicle grounding task, we focus on extracting frames from the video sequences along with their corresponding 3D bounding box annotations, while leveraging the camera calibration and pose data for accurate coordinate transformations.
Data Curation Pipeline
The Cosmos Data Curation Pipeline involves 5 main steps that transform raw video sequences and annotations into a structured training dataset:
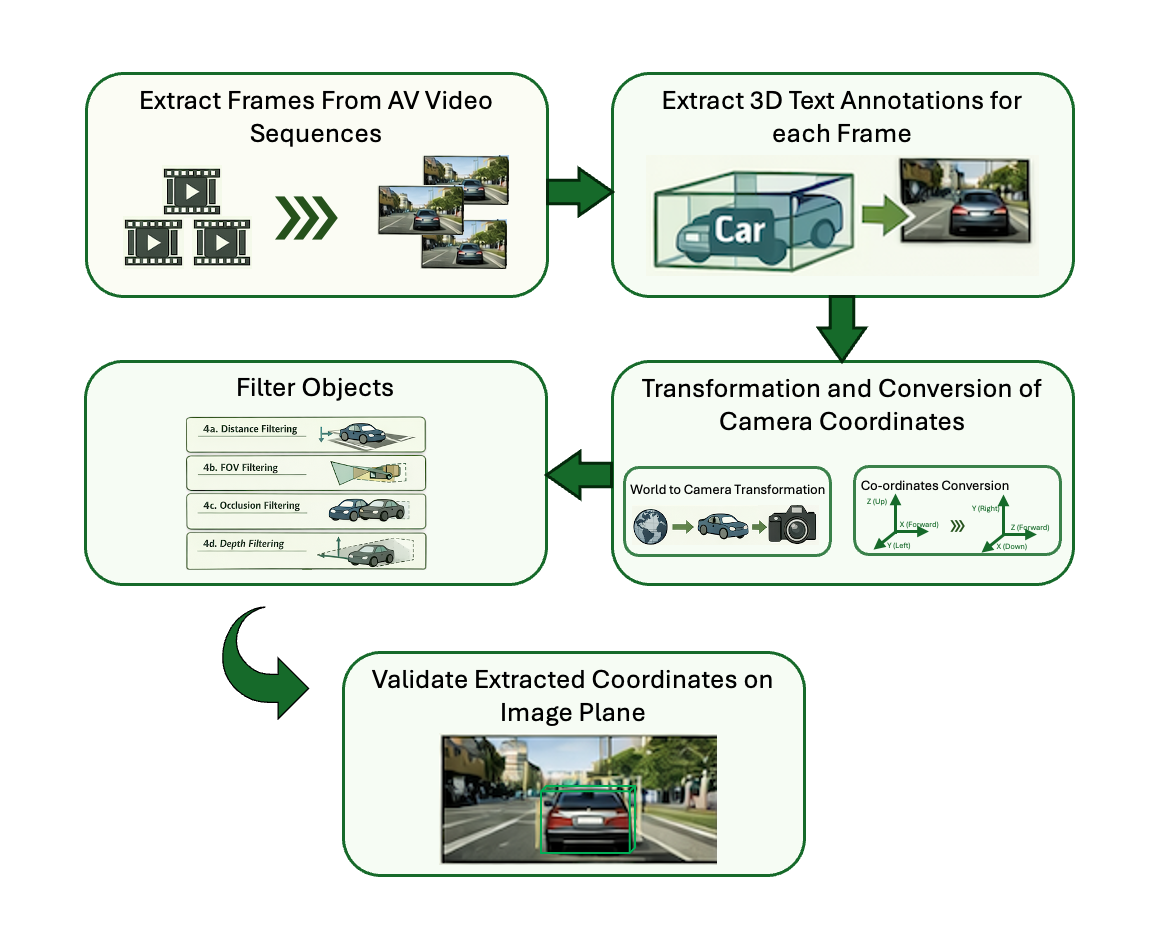
Figure: Cosmos Data Curation Pipeline showing the five main steps from video extraction to dataset validation.
Pipeline Overview:
- Extract Frames from Videos: Extract frames at specified intervals (typically 1 FPS or every 30 frames) to reduce duplication and manage dataset size.
- Extract 3D Text Annotations: Extract corresponding 3D annotations (positions, dimensions, orientations, labels, camera parameters) for each extracted frame.
- Transformation to Camera Coordinates and Coordinate System Conversion: Transform from world to camera coordinates and convert coordinate convention from FLU to RDF.
- Filter Objects: Apply filtering criteria including distance (>100m), field of view, occlusion, and depth to remove problematic annotations.
- Validate the Extracted Dataset: Project 3D bounding boxes onto 2D image plane for visual verification and quality control.
1. Load scene and extract frames
Load scene data from the sequence directory (videos, camera poses, dynamic objects) in ClipGT or RDS-HQ (MADS) format. Obtain camera intrinsics and per-frame extrinsics (camera-to-world poses) for each requested camera at the target resolution and pose rate. Sample frames at a fixed stride (e.g. every 30 frames for ~1 FPS) and save each as a high-resolution image.
# Load scene data
scene_data = load_scene(
    data_path,
    camera_names=None,
    max_frames=max_frames,
    input_pose_fps=SETTINGS["INPUT_POSE_FPS"],
    resize_resolution_hw=SETTINGS["RESIZE_RESOLUTION"],
)
all_camera_models, all_camera_poses = convert_scene_data_for_rendering(
    scene_data, camera_names, SETTINGS["RESIZE_RESOLUTION"],
)

# Frame loop: extract every skip_frames-th frame, save image per (frame, camera)
for frame_id in range(0, num_frames, skip_frames):
    for camera_name in camera_names:
        camera_pose = all_camera_poses[camera_name][frame_id]
        # ... get frame from video (read_video_simple) or overlay renderer ...
        frame_image_path = images_dir / f"{frame_basename}.jpg"
        imageio.imwrite(str(frame_image_path), frame, quality=95)
2. Extract 3D annotations per frame and camera
For each sampled frame and each camera, extract 3D annotations from the scene. Annotations include: vehicle positions in 3D, bounding box dimensions, orientation (roll, pitch, yaw), vehicle category labels, and camera parameters (intrinsics and extrinsics: focal lengths fx/fy, principal point cx/cy, camera pose, FOV). Iterate over frame indices at the chosen stride and, per camera, determine which dynamic vehicles are visible—project their 3D boxes to the image, apply filtering (distance, FOV, visibility, occlusion)—then transform each visible box from world (FLU) to camera (RDF) coordinates to produce a list of annotations per (frame, camera).
for frame_id in range(0, num_frames, skip_frames):
    for camera_name in camera_names:
        camera_model = all_camera_models[camera_name]
        camera_pose = all_camera_poses[camera_name][frame_id]

        # Extract vehicles visible in this frame (filter by FOV, distance ≤100m, visibility)
        annotations = extract_3d_annotations(
            scene_data,
            frame_id,
            camera_model,
            camera_pose,
            filter_occluded=True,
        )
3. World to camera coordinates and FLU → RDF conversion
Convert 3D bounding boxes from FLU world coordinates to RDF camera coordinates in two conceptual steps.
World to camera: World coordinates use a fixed reference (e.g. ego initial position); camera coordinates are relative to the camera and are needed for 2D projection. Using the camera pose (rotation R and translation t), transform the bbox center: P_camera = world_to_camera @ [P_world, 1]. Bounding box dimensions stay unchanged; orientation (roll, pitch, yaw) is updated for the camera frame.
FLU → RDF: After moving to camera space, convert from FLU (Front-Left-Up) to RDF (Right-Down-Forward) so outputs match standard vision/OpenCV conventions:
FLU Coordinate System (Forward-Left-Up)        RDF Coordinate System (Right-Down-Forward)
         Z (Up)                                       Y (Down)
         |                                            |
         +----> X (Forward)                           +----> X (Right)
        /                                            /
      Y (Left)                                    Z (Forward)

Transformation Mapping:
┌─────────┬──────────────┬──────────────┐
│ FLU Axis│ Direction    │ RDF Axis     │
├─────────┼──────────────┼──────────────┤
│ +X (→)  │ Forward      │ +Z (→)       │
│ +Y (←)  │ Left         │ -X (←)       │
│ +Z (↑)  │ Up           │ -Y (↑)       │
└─────────┴──────────────┴──────────────┘

Example: A point at (1, 2, 3) in FLU camera coordinates becomes (3, 1, -2) in RDF camera coordinates
  FLU Camera: (x=1, y=2, z=3)  →  RDF Camera: (x=3, y=1, z=-2)
Center transform in code:
# bbox_3d_world: [x, y, z, x_size, y_size, z_size, roll, pitch, yaw] in FLU world
center_world = np.array(bbox_3d_world[:3])
world_to_camera = np.linalg.inv(camera_pose)
center_camera = (world_to_camera @ np.hstack([center_world, 1.0]))[:3]
# Rotation (roll, pitch, yaw) is transformed to camera frame; sizes unchanged
# Output: [x_center, y_center, z_center, x_size, y_size, z_size, roll, pitch, yaw] in RDF
Why this matters: Camera coordinates allow direct 2D projection with intrinsics, simplify distance and FOV checks, give a consistent frame for multi-camera setups, and align with standard vision pipelines (RDF).
4. Filter objects
Apply these filters so only reliable annotations remain:
- Distance: Drop objects farther than 100 m.
- Field of view (FOV): Drop objects outside the camera FOV.
- Occlusion: Drop objects fully covered by closer objects.
- Depth: Prefer clearly visible objects over those behind others.
# Distance and FOV are enforced in is_bbox_in_camera_view:
# - center_cam[2] <= 0 or > 100.0 → skip; project corners, require ≥10% visible and center in bounds
# Occlusion pass (after collecting annotations with bbox_2d):
annotations_with_metadata.sort(key=lambda x: x["bbox_2d"][4] if x["bbox_2d"] else float("inf"))
for i, ann1 in enumerate(annotations_with_metadata):
    is_occluded = False
    for j, ann2 in enumerate(annotations_with_metadata[:i]):
        if is_bbox_overlapped(ann1["bbox_2d"], ann2["bbox_2d"], overlap_threshold=0.9):
            is_occluded = True
            break
    if not is_occluded:
        filtered_annotations.append({"label": ann1["label"], "bbox_3d": ann1["bbox_3d"]})
5. Write output and validate
Write output
For each (frame, camera), the pipeline writes:
- Frame image — High-resolution image (e.g. JPG) under
output_dir/images/. - Per-frame JSON — Contains
frame_id,camera,camera_params(fx, fy, cx, cy), andannotations(list oflabelandbbox_3din RDF) underoutput_dir/text/. - meta.json — One entry per (frame, camera) linking the image and its JSON, e.g.
{"id": uuid, "media": "images/<basename>.jpg", "conversation": "text/<basename>.json"}.
# annotation_data for text/<basename>.json
annotation_data = {
    "frame_id": frame_id,
    "camera": camera_name,
    "camera_params": camera_params,  # fx, fy, cx, cy
    "annotations": [{"label": "...", "bbox_3d": [x, y, z, x_size, y_size, z_size, roll, pitch, yaw]}, ...],
}
# meta.json entries: {"id": uuid, "media": "images/<basename>.jpg", "conversation": "text/<basename>.json"}
Output layout: output_dir/images/, output_dir/text/, output_dir/meta.json.
Validation (project 3D onto image plane)
Validation overlays projected 3D bounding boxes on the extracted images so you can visually verify annotation alignment and coordinate correctness. It uses only the curation outputs (one image and one JSON per frame); no scene data or rig files are required.
-
Pair image and annotation, load camera. For each image, load the annotation JSON with the same basename from the text directory. The JSON provides camera intrinsics (e.g. FTheta), camera-to-world pose (4×4), and annotations (
label,bbox_3din RDF). Build a camera model from the intrinsics for 2D projection. -
Per annotation: camera → world, then project to 2D. Each
bbox_3dis in RDF camera coordinates. Transform the bbox center to world (FLU), compute the 8 corners of the 3D box in world, transform those corners to camera coordinates, and project to pixel coordinates (use only corners with positive camera Z).
# camera_to_world_coordinates: RDF camera → FLU world
center_camera = np.array(bbox_3d_camera[:3])
center_world = (camera_pose @ np.hstack([center_camera, 1.0]))[:3]
# get_bbox_corners_3d(bbox_3d, "world"); world_to_camera @ corners; camera_model.ray2pixel_np(valid_corners)
bbox_2d = project_bbox_corners_to_image(bbox_3d_world, camera_model, camera_pose)
- Draw and save. Draw the 12 edges of each 3D box (four bottom, four top, four vertical) on the image using the projected 2D corners, then save the annotated image (e.g. to
images_annotated).
for each edge (i, j) in 12 box edges: draw_line(bbox_2d[i], bbox_2d[j])
save_image(output_path, img)
Note: For the first iteration, we selected ~700 unique sequences from the MADS dataset. After curation, this selection yields approximately ~80k frames/annotations, providing a substantial training set for 3D vehicle grounding tasks.
Dataset
The training dataset consists of autonomous vehicle camera images with corresponding 3D vehicle bounding box annotations. The dataset format uses a structured directory layout with separate metadata, conversation, and media files.
The images below illustrate the curated autonomous vehicle camera frames (left), their corresponding 3D text annotations (center), and overlay visualization (below) as used in the benchmarking and training dataset.
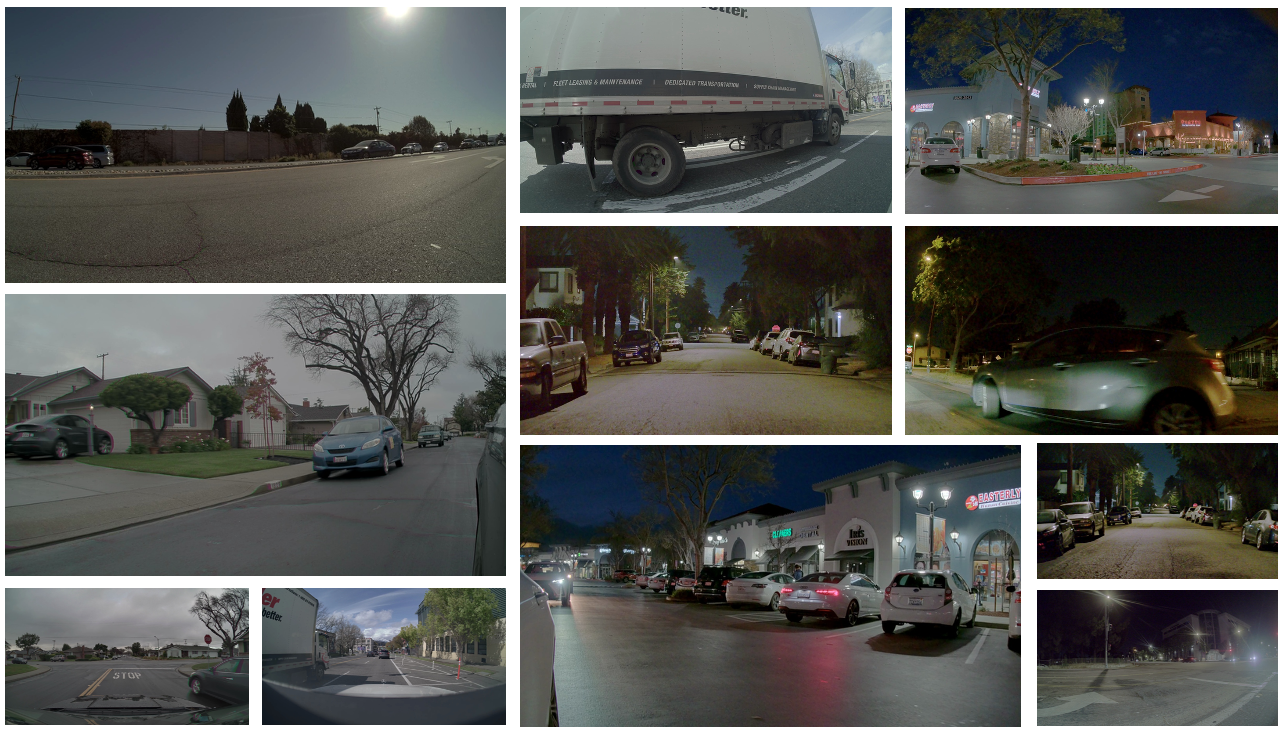
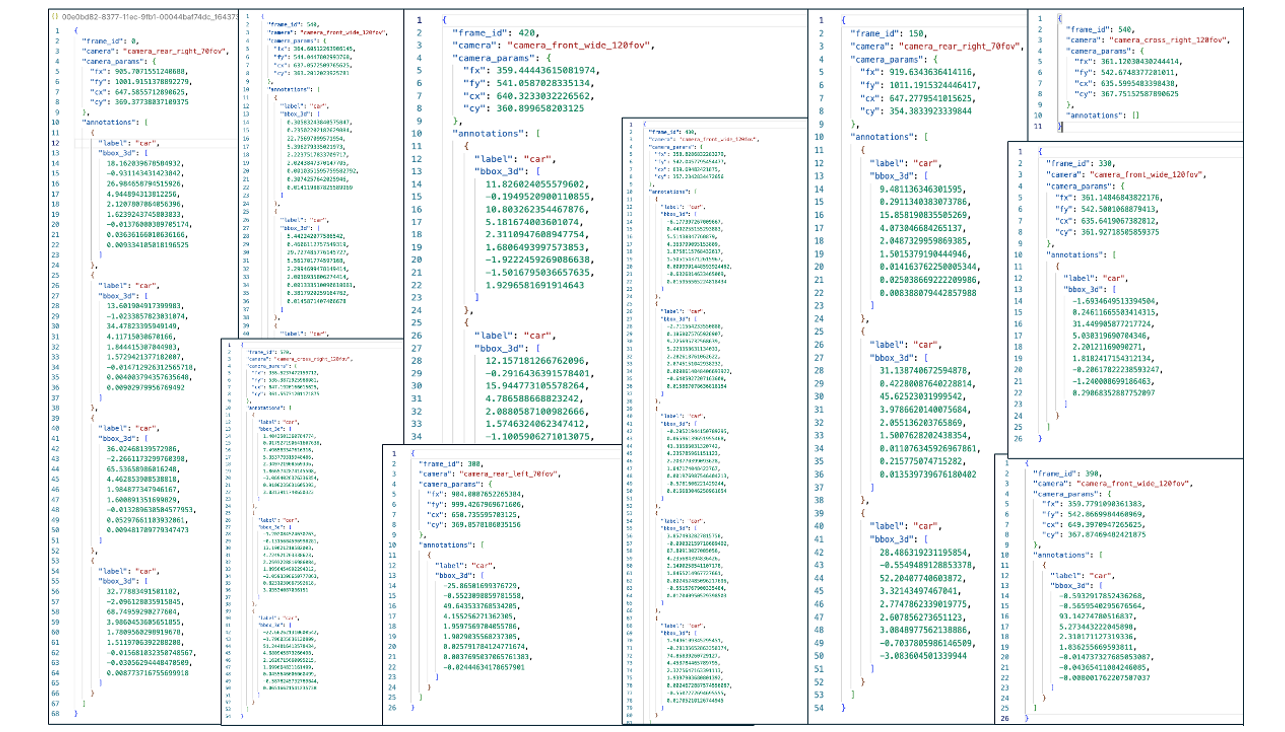

Figure: Curated AV camera frames (left), 3D text annotations (center), and overlay (below) for benchmarking and training.
Dataset Splits
The curated dataset is divided into training and evaluation splits to enable supervised fine-tuning and performance assessment. The training split contains the majority of sequences for model learning, while the evaluation split provides a held-out set for unbiased performance evaluation.
| Split | Sequences | Frames/Annotations | Purpose |
|---|---|---|---|
| Evaluation | 10 AV Multi-view Sequences | ~1.3k | For model performance assessment and validation |
| Training | 700 AV Multi-view Sequences | ~80k | For supervised fine-tuning of models |
Dataset Structure
dataset/
├── meta.json                    # Index file linking text annotations to media
├── images/                      # Directory containing all image files
│   ├── frame_000000.jpg
│   ├── frame_000030.jpg
│   └── ...
└── text/                        # Directory containing annotation files
    ├── frame_000000.json
    ├── frame_000030.json
    └── ...
meta.json Format
The meta.json file contains a list of entries, each linking a conversation to its media:
[
  {
    "id": "frame_000000",
    "media": "images/frame_000000.jpg",
    "text": "text/frame_000000.json"
  },
  {
    "id": "frame_000030",
    "media": "images/frame_000030.jpg",
    "text": "text/frame_000030.json"
  }
]
Annotation Format
Each annotation file contains 3D bounding box data for vehicles in the corresponding image, along with camera parameters:
{
  "frame_id": 0,
  "camera": "camera_cross_left_120fov",
  "camera_params": {
    "fx": 358.99285463551877,
    "fy": 540.7505167122987,
    "cx": 636.54638671875,
    "cy": 365.6412048339844
  },
  "annotations": [
    {
      "label": "car",
      "bbox_3d": [
        -8.962420703794697,    // x
        -0.15224466668225012,  // y
        18.004403863124224,    // z
        5.301581382751465,     // x_size
        2.187917470932007,     // y_size
        2.0336594581604004,    // z_size
        0.005443232293758353,  // roll
        0.6511561857044312,    // pitch
        -0.009069517922754287  // yaw
      ]
    }
  ]
}
The camera_params section contains:
- fx, fy: Focal lengths in pixels (horizontal and vertical)
- cx, cy: Principal point coordinates (optical center) in pixels
Conversation Format
The conversation files are automatically generated from annotations and follow this structure:
[
  [
    {
      "role": "system",
      "content": [{"type": "text", "text": "You are an expert AI assistant for 3D grounding. Your task is to accurately generate the 3D vehicle coordinates in the image, based on the user's input."}]
    },
    {
      "role": "user",
      "content": [
        {"type": "image", "image": "image_0"},
        {"type": "text", "text": "Find all vehicles in this image. For each vehicle, provide its 3D bounding box coordinates including x, y, z, x_size, y_size, z_size, roll, pitch, yaw and the label of the vehicle. The output format required is JSON: `[{\"bbox_3d\":[x, y, z, x_size, y_size, z_size, roll, pitch, yaw],\"label\":\"category\"}]`."}
      ]
    },
    {
      "role": "assistant",
      "content": [{"type": "text", "text": "[{\"bbox_3d\":[-8.962420703794697, -0.15224466668225012, 18.004403863124224, 5.301581382751465, 2.187917470932007, 2.0336594581604004, 0.005443232293758353, 0.6511561857044312, -0.009069517922754287], \"label\": \"car\"}]"}]
    }
  ]
]
Zero-Shot Evaluation
Before fine-tuning, you can evaluate the base model's zero-shot performance on 3D grounding tasks. This provides a baseline to compare against post-training improvements.
The evaluation uses a prompt that asks the model to identify vehicles and provide their 3D bounding box coordinates:
Prompt for 3D AV Grounding
system_prompt: |
  You are an expert AI assistant for 3D grounding. Your task is to accurately generate the 3D vehicle coordinates in the image, based on the user's input.
user_prompt: "Find all vehicles in this image. For each vehicle, provide its 3D bounding box coordinates including x, y, z, x_size, y_size, z_size, roll, pitch, yaw and the label of the vehicle. The output format required is JSON: `[{\"bbox_3d\":[x, y, z, x_size, y_size, z_size, roll, pitch, yaw],\"label\":\"category\"}]`."
To run zero-shot evaluation:
Note: Use
prompts/3d_av_grounding.yamlin your repo; if missing, copy fromdocs/recipes/post_training/reason2/av_3d_grounding/assets/prompts/3d_av_grounding.yamlinto<cosmos-reason1>/prompts/or<cosmos-reason2>/prompts/.
Cosmos Reason 1:
# From cosmos-reason1 root directory
python scripts/inference_local.py \
    --images <eval_images_dir> \
    --output <predictions_dir> \
    --prompt <cosmos-reason1>/prompts/3d_av_grounding.yaml \
    --model nvidia/Cosmos-Reason1-7B
Quick reference
COSMOS_REASON1_ROOT=/path/to/cosmos-reason1
EVAL_IMAGES=/path/to/eval/images
PRED_DIR=/path/to/output_predictions
cd $COSMOS_REASON1_ROOT
python scripts/inference_local.py --images $EVAL_IMAGES --output $PRED_DIR \
  --prompt $COSMOS_REASON1_ROOT/prompts/3d_av_grounding.yaml --model nvidia/Cosmos-Reason1-7B
Cosmos Reason 2:
# From cosmos-reason2 root directory
python scripts/inference_local.py \
    --images <eval_images_dir> \
    --output <predictions_dir> \
    --prompt <cosmos-reason2>/prompts/3d_av_grounding.yaml \
    --model nvidia/Cosmos-Reason2-8B
Quick reference
COSMOS_REASON2_ROOT=/path/to/cosmos-reason2
EVAL_IMAGES=/path/to/eval/images
PRED_DIR=/path/to/output_predictions
cd $COSMOS_REASON2_ROOT
python scripts/inference_local.py --images $EVAL_IMAGES --output $PRED_DIR \
  --prompt $COSMOS_REASON2_ROOT/prompts/3d_av_grounding.yaml --model nvidia/Cosmos-Reason2-8B
Post-Training Frameworks
This recipe supports two different training frameworks, each with its own advantages:
Cosmos-RL Framework
Cosmos-RL is an async post-training framework specialized for Supervised Fine-Tuning (SFT) and Reinforcement Learning with Human Feedback (RLHF). It prioritizes performance, scalability, and fault tolerance, making it ideal for large-scale training.
Supported Models:
- Cosmos Reason 1-7B
- Cosmos Reason 2-8B
Advantages:
- High-performance async training pipeline
- Built-in fault tolerance and checkpointing
- Optimized for multi-node distributed training
- Native support for Cosmos Reason models
Qwen-Finetune Framework
Qwen-Finetune is a fine-tuning framework based on Qwen-VL, providing a flexible and easy-to-use interface for training vision-language models.
Supported Models:
- Cosmos Reason 2-8B
Advantages:
- Simple command-line interface
- DeepSpeed ZeRO optimization support
- Flexible dataset configuration
- Easy integration with HuggingFace models
Post-Training Setup
Repositories Setup
- Cosmos Reason 1 (for Reason 1-7B SFT/RLHF)
- Cosmos Reason 2 (for Reason 2-8B SFT/RLHF)
- Qwen3-VL Finetune (for Qwen-Finetune framework)
Minimum hardware requirements
- GPU: NVIDIA A100 with at least 80GB VRAM recommended (A40, A6000, H100, 4090 may also work for SFT)
- System RAM: At least 64GB
Environment Setup
- For Cosmos-RL: Follow the main post-training guide for environment setup
- For Qwen-Finetune: Follow the Qwen-VL-Finetune setup instructions
Training dataset
- The recipe assumes your training data is accessible at
dataset/train - This path should point to the output of the data curation step OR be a symlink to your curated dataset (e.g.,
ln -s /path/to/curated_av_grounding dataset/train) - For Cosmos-RL, the directory should contain
meta.json,images/, andtext/as described above - For Qwen-Finetune, use a flat JSON file as described in the Qwen section
- Make sure
dataset/trainexists before running training; otherwise, setdataset_rootaccordingly in the config file.
Training with Cosmos-RL Framework
Quick Start - Cosmos Reason 1
Navigate to the post-training example directory:
Run supervised fine-tuning:
The default configuration uses dataset/train for training. Checkpoint path is shown in logs: ./outputs/sft-07/TIMESTAMP/safetensors/final
Quick reference
COSMOS_REASON1_ROOT=/path/to/cosmos-reason1
cd $COSMOS_REASON1_ROOT/examples/post_training_3d_grounding
source ../post_training/.venv/bin/activate
# Optional: ln -s /path/to/curated_av_grounding dataset/train
cosmos-rl --config configs/av_grounding.sft.toml scripts/av_grounding_dataloader.py
# Checkpoint: $COSMOS_REASON1_ROOT/examples/post_training_3d_grounding/outputs/sft-07/<TIMESTAMP>/safetensors/final
Quick Start - Cosmos Reason 2
Navigate to the cosmos-rl example directory:
Run supervised fine-tuning:
Quick reference
COSMOS_REASON2_ROOT=/path/to/cosmos-reason2
cd $COSMOS_REASON2_ROOT/examples/cosmos_rl
# Optional: ln -s /path/to/curated_av_grounding dataset/train
cosmos-rl --config configs/av_grounding.sft.toml scripts/av_grounding_dataloader.py
# Checkpoint: $COSMOS_REASON2_ROOT/examples/cosmos_rl/outputs/sft-07/<TIMESTAMP>/safetensors/final (or path shown in logs)
Cosmos-RL Configuration
The training configuration is specified in configs/av_grounding.sft.toml. Here are the key parameters:
Cosmos Reason 1 Configuration
redis = "12800"

[custom.dataset]
dataset_root = "dataset/train"
meta_file = "meta.json"

[custom.vision]
fps = 1
max_pixels = 40960

[train]
output_dir = "outputs/sft_cr1"
compile = false
epoch = 5
train_batch_per_replica = 32
fsdp_offload = true

[policy]
model_name_or_path = "nvidia/Cosmos-Reason1-7B"
model_max_length = 4096
model_gradient_checkpointing = true  # Ensure gradient checkpointing is enabled

[logging]
logger = ['console', 'wandb']
project_name = "cosmos_reason1"
experiment_name = "post_training_capabilities/sft_cr1"

[train.train_policy]
type = "sft"
mini_batch = 4

[train.ckpt]
enable_checkpoint = true
save_freq = 50
max_keep = 3
save_mode = "async"

[policy.parallelism]
tp_size = 1
cp_size = 1
dp_shard_size = 8
pp_size = 1
Cosmos Reason 2 Configuration
redis = "12800"

[custom.dataset]
dataset_root = "dataset/train"
meta_file = "meta.json"

[custom.vision]
fps = 1
max_pixels = 40960

[train]
output_dir = "outputs/sft_cr2_8b"
resume = true
compile = false
train_batch_per_replica = 16
epoch = 2
optm_lr = 2e-7
optm_weight_decay = 0.01
optm_warmup_steps = 0.03
optm_decay_type = "cosine"
optm_grad_norm_clip = 1.0
seed = 42

[policy]
model_name_or_path = "nvidia/Cosmos-Reason2-8B"
model_max_length = 4096
model_gradient_checkpointing = true  # Ensure gradient checkpointing is enabled

[logging]
logger = ['console', 'wandb']
project_name = "cosmos_reason2"
experiment_name = "post_training_capabilities/sft_cr2_8b"

[train.train_policy]
type = "sft"
mini_batch = 4
dataloader_num_workers = 4         # Faster data loading
dataloader_prefetch_factor = 2     # Prefetch batches

[train.ckpt]
enable_checkpoint = true
save_freq = 50
max_keep = 30
save_mode = "async"

[policy.parallelism]
tp_size = 1
cp_size = 1
dp_shard_size = 8
pp_size = 1
Key Cosmos-RL Configuration Parameters
Cosmos Reason 1:
- Model:
nvidia/Cosmos-Reason1-7B(7B parameter model) - Epochs: 5 epochs
- Batch Size: 32 per replica
- Learning Rate: Default from config
- Memory Optimization: FSDP offloading and gradient checkpointing enabled
Cosmos Reason 2:
- Model:
nvidia/Cosmos-Reason2-8B(8B parameter model) - Epochs: 2 epochs
- Batch Size: 16 per replica
- Learning Rate: 2e-7
- Memory Optimization: Gradient checkpointing enabled
Common Settings:
- Training Type: Supervised Fine-Tuning (SFT)
- Parallelism: Data parallelism with shard size of 8
- Dataset: Points to
dataset/trainwithmeta.jsonmetadata file - Vision Settings:
- FPS: 1 (for video inputs)
- Max pixels: 40,960 per frame
- Logging: Console and Weights & Biases (wandb) integration
- Checkpointing: Async checkpointing every 50 steps
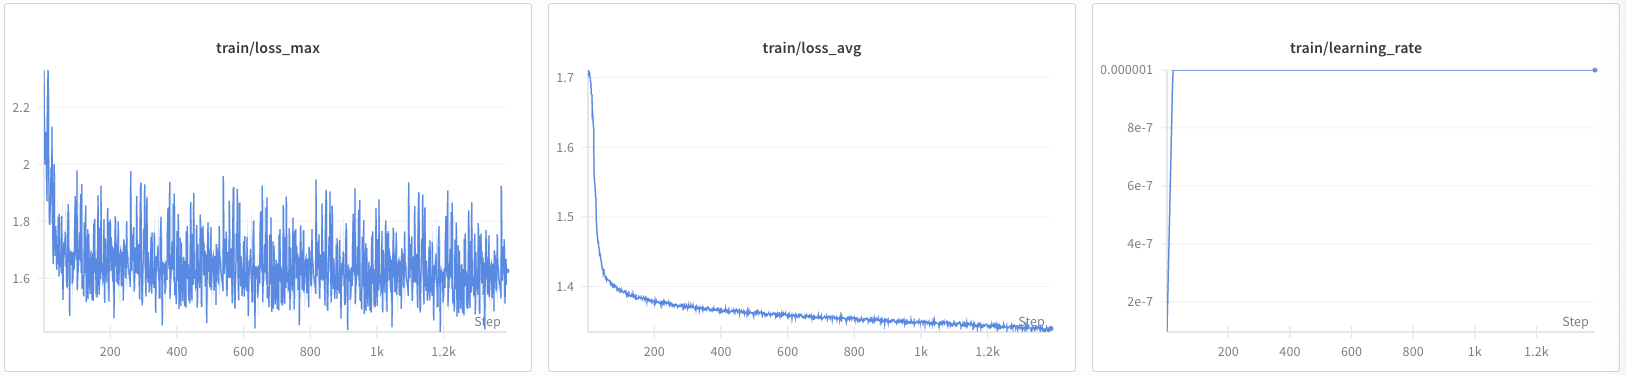
Monitoring Cosmos-RL Training
Training progress is logged to:
- Console: Real-time training metrics
- Weights & Biases:
- Cosmos Reason 1: Project
cosmos_reason1, experimentpost_training_capabilities/sft_v7_cr1 - Cosmos Reason 2: Project
cosmos_reason2, experimentpost_training_capabilities/sft_v7_cr2_8b
Key metrics to monitor:
- Training loss
- Learning rate schedule
- GPU memory usage
- Checkpoint save status
Training Progress Visualization:
The following graphs show the training progress for both Cosmos Reason 1 and Cosmos Reason 2 models:
Cosmos Reason 1 Training:
Cosmos Reason 2 Training:

Training with Qwen-Finetune Framework
Quick Start - Cosmos Reason 2
Navigate to your Qwen-VL-Finetune repository directory (the clone root, often named qwen-vl-finetune or Qwen3-VL):
Copy the training script from this recipe into the repo: save the script shown below as scripts/qwen_finetune_script.sh in your clone (or copy assets/scripts/qwen_finetune_script.sh from this recipe into that path). Then run:
Quick reference
QWEN_FINETUNE_ROOT=/path/to/qwen-vl-finetune   # or Qwen3-VL clone
cd $QWEN_FINETUNE_ROOT
# Ensure qwenvl/data/train/ and qwenvl/data/eval/ exist with annotations.json (and images/)
# Convert from meta.json+text/ if needed:
#   python tools/convert_av3d_to_qwen_dataset.py --source_dir /path/to/eval --output_dir ./qwenvl/data/eval --copy_images
bash scripts/qwen_finetune_script.sh
# Checkpoint: see script output_dir (e.g. ./outputs/av_3d_grounding_sft_qwen3_cr2_8b)
Qwen-Finetune Configuration
The training script content is provided below. Save it as scripts/sft_av_3d_grounding_cr2_8b.sh in your Qwen-VL-Finetune repository:
Qwen-Finetune Training Script
#!/bin/bash
# Copyright 2026 NVIDIA CORPORATION & AFFILIATES
#
# Licensed under the Apache License, Version 2.0 (the "License");
# you may not use this file except in compliance with the License.
# You may obtain a copy of the License at
#
#     http://www.apache.org/licenses/LICENSE-2.0
#
# Unless required by applicable law or agreed to in writing, software
# distributed under the License is distributed on an "AS IS" BASIS,
# WITHOUT WARRANTIES OR CONDITIONS OF ANY KIND, either express or implied.
# See the License for the specific language governing permissions and
# limitations under the License.
#
# SPDX-License-Identifier: Apache-2.0


# Training script for AV 3D Grounding finetuning - Cosmos-Reason2-8B model

# Model configuration
llm="nvidia/Cosmos-Reason2-8B"

# Weights & Biases configuration
export WANDB_PROJECT="qwen3-vl_cosmos_reason2"
run_name="av_3d_grounding_sft_qwen3_vl_cr2_8b"

# Output directory
output_dir=./outputs/av_3d_grounding_sft_qwen3_vl_cr2_8b

# Distributed training configuration
MASTER_ADDR=${MASTER_ADDR:-"127.0.0.1"}
MASTER_PORT=${MASTER_PORT:-$(shuf -i 20001-29999 -n 1)}
NPROC_PER_NODE=${NPROC_PER_NODE:-$(nvidia-smi --list-gpus | wc -l)}

# DeepSpeed configuration
deepspeed=./scripts/zero3.json

# Training hyperparameters
lr=2e-7
batch_size=2
grad_accum_steps=8

# Training entry point
entry_file=qwenvl/train/train_qwen.py

# Dataset configuration - using Cosmos Reason 1/2 AV 3D Grounding dataset
# =====================================================
# AV 3D Grounding Dataset Conversion (Qwen-Finetune) if not already converted
#
# This section uses scripts/convert_av3d_to_qwen_dataset.py to convert the original AV 3D Grounding dataset in Cosmos Reason 1/2 format to the Qwen-Finetune format.
#
# Example usage:
#   python3 scripts/convert_av3d_to_qwen_dataset.py \
#       --source_dir /path/to/cosmos-reason1/.../dataset/eval/ \
#       --output_dir /path/to/qwenvl/data/eval
#
# And then add converted datasets to qwenvl/data/__init__.py
#   AV3DGROUNDING_TRAIN_DATASET = {
#       "annotation_path": "/path/to/qwenvl/data/train/annotations.json",
#       "data_path": "/path/to/qwenvl/data/train/",
#   }
#   AV3DGROUNDING_EVAL_DATASET = {
#       "annotation_path": "/path/to/qwenvl/data/eval/annotations.json",
#       "data_path": "/path/to/qwenvl/data/eval/",
#   }
# =====================================================
datasets=av3dgrounding_train
eval_datasets=av3dgrounding_eval

# Cache directory
cache_dir=./cache

echo "============================================"
echo "Starting training for model: $llm"
echo "Training dataset: $datasets"
echo "Evaluation dataset: $eval_datasets"
echo "Output directory: $output_dir"
echo "============================================"

# Launch training
# Parameters using sft.sh suggested finetuning configuration
torchrun --nproc_per_node=${NPROC_PER_NODE} \
         --master_addr=${MASTER_ADDR} \
         --master_port=${MASTER_PORT} \
         ${entry_file} \
         --deepspeed ${deepspeed} \
         --model_name_or_path "${llm}" \
         --dataset_use ${datasets} \
         --eval_dataset_use ${eval_datasets} \
         --eval_on_start \
         --data_flatten True \
         --tune_mm_vision True \
         --tune_mm_mlp True \
         --tune_mm_llm True \
         --bf16 \
         --output_dir ${output_dir} \
         --cache_dir ${cache_dir} \
         --num_train_epochs 2 \
         --per_device_train_batch_size ${batch_size} \
         --per_device_eval_batch_size 1 \
         --gradient_accumulation_steps ${grad_accum_steps} \
         --save_strategy "steps" \
         --save_steps 20 \
         --save_total_limit 20 \
         --learning_rate ${lr} \
         --weight_decay 0.01 \
         --warmup_ratio 0.03 \
         --max_grad_norm 1 \
         --lr_scheduler_type "cosine" \
         --logging_steps 1 \
         --model_max_length 4096 \
         --gradient_checkpointing True \
         --dataloader_num_workers 0 \
         --seed 42 \
         --run_name ${run_name} \
         --report_to wandb

# Check if training was successful
if [ $? -ne 0 ]; then
    echo "Training failed for model: $llm"
    exit 1
fi

echo "============================================"
echo "Training completed successfully!"
echo "Model saved to: $output_dir"
echo "============================================"
Key Qwen-Finetune Configuration Parameters
- Model:
nvidia/Cosmos-Reason2-8B(8B parameter model) - Training Type: Supervised Fine-Tuning (SFT)
- Epochs: 2 epochs
- Batch Size: 2 per device with gradient accumulation of 8 (effective batch size: 16)
- Learning Rate: 2e-7
- Optimization: DeepSpeed ZeRO-3 for memory efficiency
- Dataset: Uses
av3dgrounding_trainandav3dgrounding_evaldatasets - Tuning: Tunes vision, MLP, and LLM components
- Precision: BF16 mixed precision training
- Logging: Weights & Biases integration
Training Progress Visualization:
The following graph shows the training progress for Cosmos Reason 2 using the Qwen-Finetune framework:
Qwen-Finetune Training:

Qwen-Finetune Dataset Format
Qwen-Finetune uses the annotations.json format, a simplified single-file format specific to that framework. The standard format for Cosmos-RL (described earlier in this recipe) uses meta.json with separate images/ and text/ directories. The annotations.json format is shown below:
[
  {
    "image": "images/frame_000000.jpg",
    "conversations": [
      {
        "from": "human",
        "value": "<image>\nFind all vehicles in this image. For each vehicle, provide its 3D bounding box coordinates including x, y, z, x_size, y_size, z_size, roll, pitch, yaw and the label of the vehicle. The output format required is JSON: `[{\"bbox_3d\":[x, y, z, x_size, y_size, z_size, roll, pitch, yaw],\"label\":\"category\"}]`."
      },
      {
        "from": "gpt",
        "value": "[{\"bbox_3d\":[-8.962420703794697, -0.15224466668225012, 18.004403863124224, 5.301581382751465, 2.187917470932007, 2.0336594581604004, 0.005443232293758353, 0.6511561857044312, -0.009069517922754287], \"label\": \"car\"}]"
      }
    ]
  }
]
Monitoring Qwen-Finetune Training
Training progress is logged to:
- Console: Real-time training metrics
- Weights & Biases: Project
qwen3-vl_cosmos_reason2, run nameav_3d_grounding_sft_qwen3_vl_cr2_8b
Key metrics to monitor:
- Training loss
- Evaluation metrics (if eval dataset is provided)
- Learning rate schedule
- GPU memory usage
- Checkpoint save status
Evaluation
After training, evaluate the fine-tuned model on the evaluation dataset:
Cosmos Reason 1 Evaluation
# From cosmos-reason1 root directory
python scripts/inference_local.py \
    --images <eval_images_dir> \
    --output <predictions_dir> \
    --prompt <cosmos-reason1>/prompts/3d_av_grounding.yaml \
    --model <path_to_finetuned_checkpoint>
Quick reference
COSMOS_REASON1_ROOT=/path/to/cosmos-reason1
EVAL_IMAGES=/path/to/eval/images
PRED_DIR=/path/to/output_predictions
CKPT=$COSMOS_REASON1_ROOT/examples/post_training_3d_grounding/outputs/sft-07/<TIMESTAMP>/safetensors/final
cd $COSMOS_REASON1_ROOT
python scripts/inference_local.py --images $EVAL_IMAGES --output $PRED_DIR \
  --prompt $COSMOS_REASON1_ROOT/prompts/3d_av_grounding.yaml --model $CKPT
Cosmos Reason 2 Evaluation
# From cosmos-reason2 root directory
python scripts/inference_local.py \
    --images <eval_images_dir> \
    --output <predictions_dir> \
    --prompt <cosmos-reason2>/prompts/3d_av_grounding.yaml \
    --model <path_to_finetuned_checkpoint>
Quick reference
COSMOS_REASON2_ROOT=/path/to/cosmos-reason2
EVAL_IMAGES=/path/to/eval/images
PRED_DIR=/path/to/output_predictions
CKPT=$COSMOS_REASON2_ROOT/examples/cosmos_rl/outputs/sft-07/<TIMESTAMP>/safetensors/final
cd $COSMOS_REASON2_ROOT
python scripts/inference_local.py --images $EVAL_IMAGES --output $PRED_DIR \
  --prompt $COSMOS_REASON2_ROOT/prompts/3d_av_grounding.yaml --model $CKPT
The evaluation script generates JSON files containing predicted 3D bounding boxes for each image. Compare these predictions against ground truth annotations using the following evaluation metrics:
Evaluation Metrics
Average Precision (AP) Metrics
AP2D (Average Precision in 2D): Measures detection accuracy in the 2D image plane using axis-aligned IoU.
- 2D Axis-Aligned IoU: Projects 3D bounding boxes onto the 2D image plane and computes the Intersection over Union of the axis-aligned 2D bounding boxes
- Calculation: For each predicted vehicle, project its 3D bounding box corners to 2D image coordinates, compute the axis-aligned bounding rectangle, and compare with ground truth 2D projections
- AP2D Score: Computes Average Precision across different IoU thresholds (typically 0.5, 0.75) using the standard COCO evaluation protocol
- Formula:
AP3D (Average Precision in 3D): Measures detection accuracy in 3D space using axis-aligned IoU.
- 3D Axis-Aligned IoU: Computes the Intersection over Union of axis-aligned 3D bounding boxes (ignoring orientation)
- Calculation: For each predicted vehicle, compute the axis-aligned 3D bounding box (aligned with world coordinate axes) and compare with ground truth axis-aligned boxes
- AP3D Score: Computes Average Precision across different IoU thresholds (typically 0.25, 0.5, 0.75) in 3D space
- Formula:
Key Differences
- AP2D evaluates how well vehicles are detected and localized in the 2D image plane
- AP3D evaluates how well vehicles are localized in 3D world space
- Axis-Aligned IoU simplifies the computation by ignoring rotation, focusing on position and size accuracy
Additional Metrics
- Position Accuracy: Mean error in x, y, z coordinates (in meters)
- Orientation Accuracy: Mean error in roll, pitch, yaw angles (in degrees)
- Detection Rate: Percentage of vehicles correctly detected (true positives / total ground truth)
- Precision: Ratio of true positives to all positive predictions
- Recall: Ratio of true positives to all ground truth objects
Evaluation Script
To evaluate your predictions with all the described metrics, use the evaluation script from the recipe assets: bbox_3d_evaluator.py:
python docs/recipes/post_training/reason2/av_3d_grounding/assets/scripts/bbox_3d_evaluator.py <predictions_dir> <ground_truth_dir> [--iou-threshold 0.5] [--verbose]
<predictions_dir>: Path to the directory with your predicted JSON files generated from inference.<ground_truth_dir>: Path to the directory with ground truth annotation JSON files.--iou-threshold: (Optional) IoU threshold for considering a match as correct (default is 0.5).
The script outputs all metrics described above, including: AP2D, AP3D, mean IoU, IoU accuracy (%), label accuracy (%), position and orientation errors, detection rate, precision, recall, and detailed AP scores at standard thresholds (e.g., 0.5, 0.75).
See script help (-h) for advanced options or custom thresholds.
Quick reference
# From cookbook repo root (or path containing the script)
PRED_DIR=/path/to/output_predictions      # inference output JSONs (one per image)
GT_DIR=/path/to/eval/text              # ground truth JSONs
python docs/recipes/post_training/reason2/av_3d_grounding/assets/scripts/bbox_3d_evaluator.py \
  $PRED_DIR $GT_DIR --iou-threshold 0.5 --verbose
Results
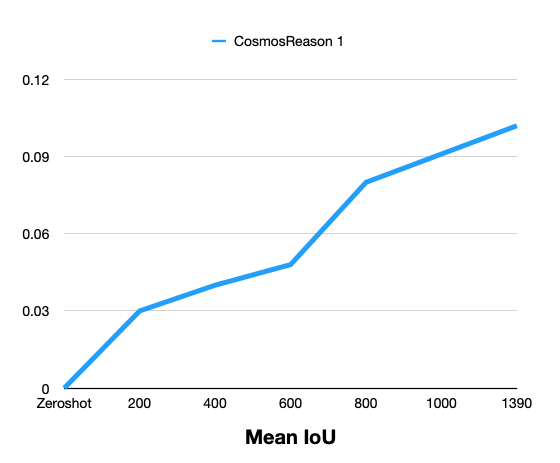
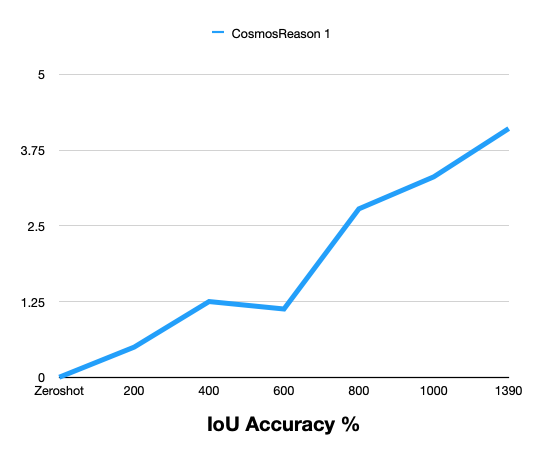
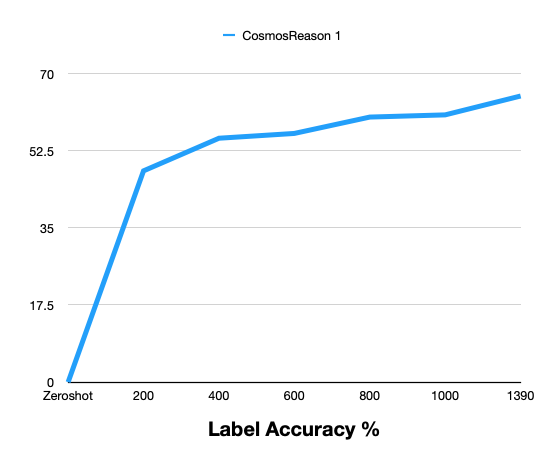
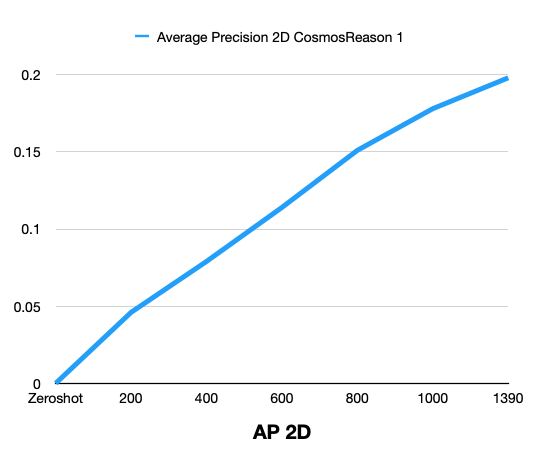
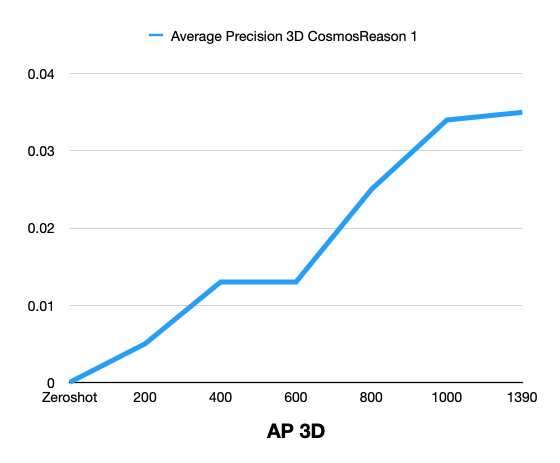
The following tables compare zero-shot (base model) and post-trained performance on the held-out evaluation set (~1.3k frames). Post-training consistently improves 3D vehicle grounding over the zero-shot baseline.
Cosmos Reason 1: Zero-Shot vs Post-Training (by steps)
| Metric | Zero-Shot | 200 | 400 | 600 | 800 | 1000 | 1390 |
|---|---|---|---|---|---|---|---|
| Mean IoU | 0 | 0.030 | 0.040 | 0.048 | 0.080 | 0.091 | 0.102 |
| IoU Accuracy % | 0 | 0.497 | 1.249 | 1.126 | 2.779 | 3.308 | 4.104 |
| Label Accuracy % | 0 | 47.93 | 55.33 | 56.42 | 60.13 | 60.63 | 64.91 |
| Average Precision 2D | 0 | 0.046 | 0.079 | 0.114 | 0.151 | 0.178 | 0.198 |
| Average Precision 3D | 0 | 0.005 | 0.013 | 0.013 | 0.025 | 0.034 | 0.035 |
Result Comparison Graphs
The following graphs show zero-shot vs post-training comparison across training steps for Cosmos Reason 1.
Cosmos Reason 2: Zero-Shot vs Post-Training
Cosmos Reason 2 results can be added in the same format after evaluation.
Summary: Post-training with the curated MADS (RDS-HQ) data substantially improves 3D vehicle grounding over zero-shot for Cosmos Reason 1: Mean IoU rises from 0 to 0.102, AP2D from 0 to 0.198, AP3D from 0 to 0.035, IoU Accuracy to 4.10%, and Label Accuracy to 64.91% at 1390 training steps. Metrics improve monotonically with more training steps.
Framework Comparison
| Aspect | Cosmos-RL | Qwen-Finetune |
|---|---|---|
| Supported Models | Cosmos Reason 1 & 2 | Cosmos Reason 2 |
| Training Type | SFT, RLHF | SFT |
| Distributed Training | Built-in multi-node support | PyTorch Distributed + DeepSpeed |
| Memory Optimization | FSDP, gradient checkpointing | DeepSpeed ZeRO-3, gradient checkpointing |
| Checkpointing | Async checkpointing | Standard checkpointing |
| Dataset Format | meta.json + structured directories (standard) |
annotations.json (Qwen-Finetune simplified) |
| Best For | Large-scale production training | Quick experimentation and prototyping |
Troubleshooting
Common issues and how to resolve them:
- Out of memory (OOM) / CUDA OOM during training
- Reduce batch size in your training config (e.g.
batch_size,per_device_train_batch_size, or the equivalent in the Cosmos-RL config). - Enable gradient checkpointing if not already on.
-
For Cosmos-RL: reduce
batch_sizeor use fewer workers; for Qwen-Finetune: lowerper_device_train_batch_sizeand/or enable DeepSpeed ZeRO-3. -
“Dataset not found” or missing samples
- Confirm
dataset_root(or the path in your config) points to the curated dataset directory. - Ensure that directory contains
meta.json(Cosmos-RL) or the expectedannotations.json(Qwen-Finetune), plusimages/andtext/(or the correct layout for your framework). -
Check that
meta.jsonentries reference existing files underimages/andtext/(paths are relative to the dataset root). -
Training is stable but metrics barely improve (or get worse)
- Confirm train vs eval data: no train/eval leakage, and eval set is held-out; verify
meta.jsonvsmeta_evaluate.json(or equivalent) splits. - Check coordinate and unit consistency: training annotations and evaluation expect the same convention (e.g. FLU vs RDF, meters, radians). The curation pipeline output and the model’s expected format must match.
- Try a smaller learning rate and more steps, or reduce regularization (e.g. weight decay) if the model is underfitting.
-
If you switched frameworks (Cosmos-RL vs Qwen-Finetune), ensure the same prompt and response format (e.g. JSON structure for
bbox_3dandlabel) so the task is identical. -
Multi-GPU or multi-node: hangs, timeouts, or “address already in use”
- Set
MASTER_ADDR,MASTER_PORT, andRANK/WORLD_SIZE(or use the framework’s launcher) so all processes see the same master and port. - Use a unique port per run and ensure firewalls or cluster policies allow it.
-
For Cosmos-RL, follow the repo’s multi-node docs; for Qwen-Finetune/DeepSpeed, use
deepspeedortorchrunwith the correct hostfile and number of processes. -
Resuming from checkpoint fails or training restarts from step 0
- Ensure the resume path points to the actual checkpoint directory or file (not the run directory root unless that’s what the config expects).
-
With distributed training, restore the same world size and (if applicable) the same checkpoint for all ranks; some scripts expect a single shared checkpoint path.
-
Good training metrics but poor evaluation (e.g. low AP3D / IoU)
- Verify evaluation uses the same coordinate convention and units as training (RDF, meters, radians). Reproject or convert predictions/ground truth if the evaluator expects a different convention.
- Ensure prediction JSON structure matches exactly what the evaluator reads (e.g.
annotationslist withbbox_3dandlabel). - Check for a train/eval domain gap (e.g. different cameras or scenes); consider adding more diverse data or a small eval-aligned subset.
Additional Resources
- Cosmos Reason 1 Post-Training Guide
- Cosmos Reason 2 Post-Training Guide
- Cosmos-RL Documentation
- Qwen-VL-Finetune Repository
- 3D AV Grounding Example - Cosmos Reason 1
- 3D AV Grounding Example - Cosmos Reason 2
Document Information
Publication Date: February 18, 2026
Citation
If you use this recipe or reference this work, please cite it as:
@misc{cosmos_cookbook_av_3d_grounding_2026,
  title={3D Autonomous Vehicle Grounding Post-Training with Cosmos Reason 1 \& 2},
  author={Fasale, Amol and Jin, Jingyi},
  year={2026},
  month={February},
  howpublished={\url{https://nvidia-cosmos.github.io/cosmos-cookbook/recipes/post_training/reason2/av_3d_grounding/post_training.html}},
  note={NVIDIA Cosmos Cookbook}
}
Suggested text citation:
Amol Fasale & Jingyi Jin (2026). 3D Autonomous Vehicle Grounding Post-Training with Cosmos Reason 1 & 2. In NVIDIA Cosmos Cookbook. Accessible at https://nvidia-cosmos.github.io/cosmos-cookbook/recipes/post_training/reason2/av_3d_grounding/post_training.html