Multi-Control Recipes with Cosmos Transfer 2.5
Authors: Aiden Chang • Akul Santhosh Organization: NVIDIA
Overview
You can experiment with these recipes and customize them for your own videos using this Brev instance. It comes fully pre-configured and will automatically provision the necessary compute so you can get started right away.

| Model | Workload | Use Case |
|---|---|---|
| Cosmos Transfer 2.5 | Inference | Multi-control video editing for background replacement, lighting adjustment, object transformation, and color/texture changes |
Please make sure to read the core concepts on control modalities in the Control Modalities Summary before proceeding. It is important to understand each control modality before proceeding.
Cosmos Transfer 2.5 enables precise video manipulation using multiple control modalities (Edge, Segmentation, Vis) with masking capabilities. This cookbook provides four key recipes for common video editing tasks, each optimized for predictable, high-quality results.
Control Modalities Reference
Before diving into recipes, here are the basic control modalities we'll be using. Please make sure to read the core concepts on control modalities in the Control Modalities Summary before proceeding.:
| Control Type | Description | Example |
|---|---|---|
| Original Video | Source video input | |
| Edge | Canny edge detection output | |
| Filtered Edge | Edge with mask applied (keeping only desired edges) | |
| Segmentation | Semantic segmentation map | |
| Vis | Visual features from original | |
| Mask | Binary mask (white = change allowed) | |
| Inverted Mask | Inverse of mask (white = background) |
Note: Edge and Vis can be automatically computed on the fly.
Quick Recipes: Common Use Cases
Use this table as a starting point for your projects.
| Task | Suggested Controls & Settings | Original Video | Augmented Video |
|---|---|---|---|
| Change clothing or textures | Edge: 1, Guidance: 3 | ||
| Change lighting | Guidance: 3, Edge: 1 + Vis: 0.2 | ||
| Change background, keep subject | Guidance: 3, Edge Filtered: 1.0 + Seg (Mask Inverted): 0.4 + Vis: (medium weight, e.g., 0.6) | ||
| Make object changes, but keep it realistic | Guidance: 3, Edge: 0.2 + Seg (Mask): 1.0 + Vis: (medium weight, e.g., 0.5) |
Recipe 1: Background Change
Overview
Replace video backgrounds while preserving foreground subjects and their motion. This recipe is ideal for placing subjects in new environments without reshooting.
Example Results
| Original | Background Changed |
|---|---|
Pipeline Configuration
{
  "name": "change_background",
  "prompt_path": "prompt.txt",
  "video_path": "original.mp4",
  "guidance": 3,
  "edge": {
    "control_weight": 1.0,
    "control_path": "filtered_edge.mp4"
  },
  "seg": {
    "control_weight": 0.4,
    "control_path": "segmentation.mp4",
    "mask_path": "mask_inverted.mp4"
  },
  "vis": {
    "control_weight": 0.6
  }
}
Step-by-Step Process
1. Generate Filtered Edge
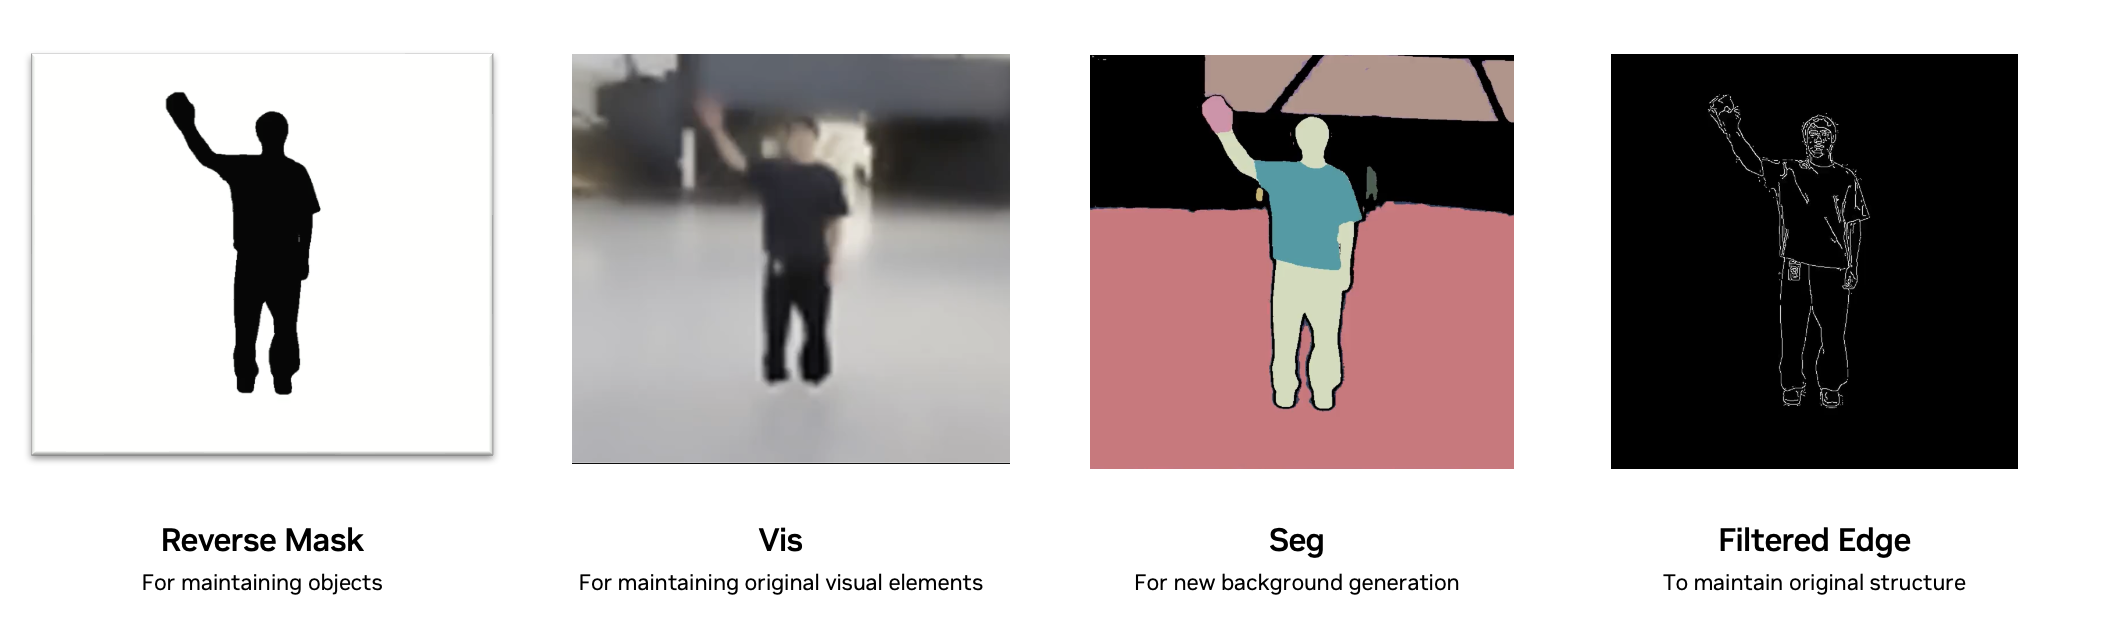
Extract edges only for the objects you want to preserve (e.g., human, table). In this example, we only want to keep the person waving and modify everything else in the scene. Therefore, we generate a filtered edge map that isolates the human’s edges. For more details on generating filtered edges, see this section.
Extract edges only for objects to preserve (human, table, etc.)
2. Create Inverted Mask
Reference this section for inverting the mask.
3. Configure Controls
- Edge (1.0): Preserve subject structure completely
- Seg (0.4) + Inverted Mask: Allow realistic background generation
- Vis (0.6): Maintain lighting consistency and fisheye distortion
4. Results
- Original background completely replaced
- Subject motion and structure preserved
- Realistic lighting and perspective maintained
- Fisheye lens distortion preserved
5. Debugging
- Turn down
visif there exist some artifacts of the original video. - Turn up
segto generate a more complicated background. - Incorrect scaling / proportion: Depth control may solve this issue, but this seems like an edge case.
Here's another result generated with "ocean" as the background. I had to turn down the vis due to the background artifacts.
| Original Video | High Vis | Low Vis |
|---|---|---|
For reference, this is the ocean prompt:
A realistic, static full-body shot of a young man standing outdoors near the coast. He has short dark hair and is dressed casually in a dark grey t-shirt, loose black pants, and white sneakers, with an ID badge clipped to his waistband. He faces the camera directly and waves his right hand continuously in a friendly greeting. The surrounding environment is bright and open. In the background, a vast ocean stretches out toward the horizon, with gentle waves, shimmering reflections, and a clear blue sky above. A coastal walkway with railings and scattered pedestrians lines the foreground, replacing the busy city street elements. Soft natural lighting from the sun enhances the calm, breezy seaside atmosphere.
Recipe 2: Lighting Change
Overview
Modify scene lighting conditions (e.g., day to night, indoor to outdoor lighting) while maintaining object structure and composition.

Example Results
| Original | Lighting Changed |
|---|---|
Pipeline Configuration
{
  "name": "change_lighting",
  "prompt_path": "lighting_prompt.txt",
  "video_path": "original.mp4",
  "guidance": 3,
  "edge": {
    "control_weight": 1.0
  },
  "vis": {
    "control_weight": 0.2
  }
}
Comparison: With and Without vis
| Original Video | Edge Only | Edge + Vis |
|---|---|---|
Configure Controls
- Edge (1.0): Full structure preservation
- Vis (0.2): Small amount for realistic lighting physics
- No Segmentation: Not needed for global lighting changes
This is the prompt that was used:
A realistic, static full-body shot of a young man standing in the center of a spacious, modern atrium. He has short dark hair and is dressed casually in a dark grey t-shirt, loose black pants, and white sneakers, with an ID badge clipped to his waistband. He faces the camera directly and waves his right hand continuously in a friendly greeting. The surrounding space is bright and open, featuring a high industrial-style ceiling with exposed white beams and large, angular black structural supports. The floor is polished light grey concrete, subtly reflecting the warm, soft afternoon sunlight that pours in from large windows above. The overall lighting has a gentle golden tint, with natural shadows stretching slightly to the side in the way they do during late afternoon. In the background, a mezzanine level with glass railings is visible, along with several modern wooden benches and tables scattered throughout the area.
Recipe 3: Color/Texture Change
Overview
Modify colors or textures of specific objects without altering structure. Simplest recipe, ideal for product variations.
Example Results
| Original | Color/Texture Changed |
|---|---|
Pipeline Configuration
{
  "name": "color_change",
  "prompt_path": "color_prompt.txt",
  "video_path": "original.mp4",
  "guidance": 3,
  "edge": {
    "control_weight": 1.0
  }
}
Why No Vis Control?
- Vis would preserve original colors/textures
- Pure edge control allows color changes while maintaining structure
- Trade-off: May see minor color shifts in other areas
Configure Controls
- Edge (1.0): Full structure preservation.
- Specify in the prompt exactly what to change.
This is the prompt that was used:
A realistic, static full-body shot of a young man standing in the center of a spacious, modern atrium. He has short dark hair and is dressed casually in a red t-shirt, loose black pants, and white sneakers, with an ID badge clipped to his waistband. He faces the camera directly and waves his right hand continuously in a friendly greeting. The surrounding space is bright and open, featuring a high industrial-style ceiling with exposed white beams and large, angular black structural supports. The floor is polished light grey concrete, reflecting the artificial overhead lighting. In the background, a mezzanine level with glass railings is visible, along with several modern wooden benches and tables scattered throughout the area.
White color generation issues: We've seen some issues with the generation of white colors, but this is also an edge case.
Recipe 4: Object Change
Overview
Transform specific objects while maintaining realistic interaction and physics. Perfect for product variations or creative editing.
Example Results
| Original | Object Changed |
|---|---|
Pipeline Configuration
{
  "name": "object_change",
  "prompt_path": "object_prompt.txt",
  "video_path": "original.mp4",
  "guidance": 3,
  "edge": {
    "control_weight": 0.2
  },
  "seg": {
    "control_weight": 1.0,
    "control_path": "segmentation.mp4",
    "mask_path": "object_mask.mp4"
  },
  "vis": {
    "control_weight": 0.5
  }
}
Step-by-Step Process
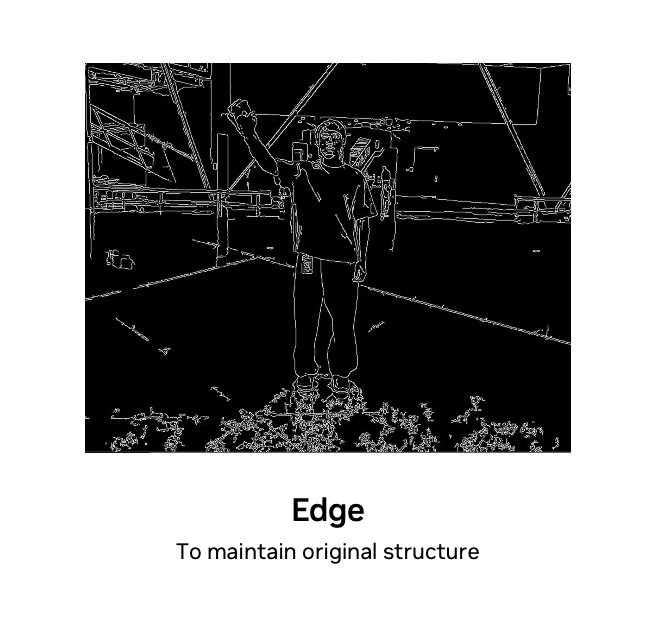
1. Generate Standard Edge Map
Unlike background replacement, we use the full edge map with a low weight (0.2). This allows the model to deviate from the original object structure while maintaining scene coherence.
Why low edge weight? If you're changing a chip bag into a watermelon, the shape must change dramatically. High edge weight would force the model to keep the bag's shape, creating unrealistic results.
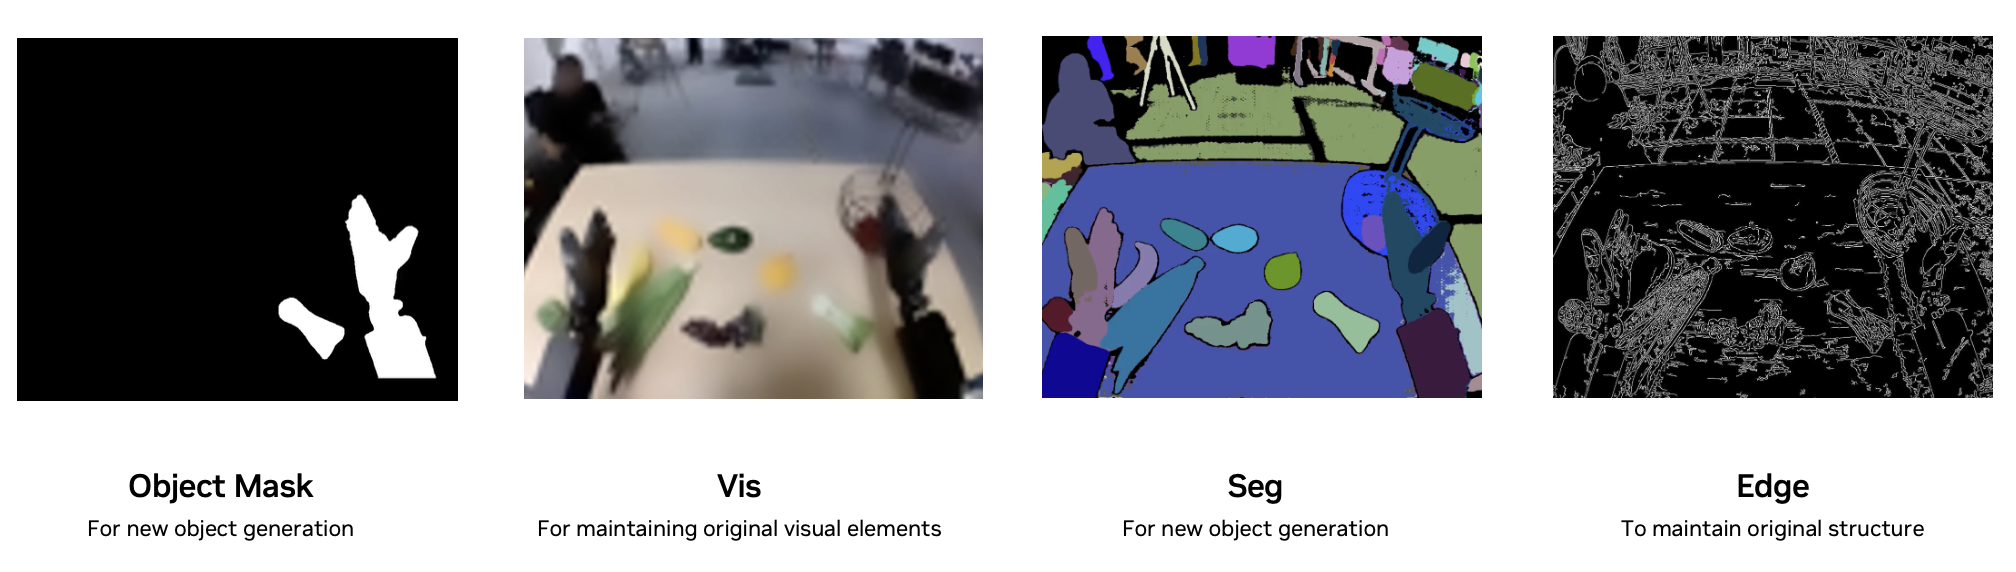
2. Create Object Mask
Generate a mask that includes both the object AND any interacting elements (e.g., robotic gripper). White pixels indicate areas the model can modify. The mask should include:
- Primary object (e.g., vegatable) - white pixels
- Interacting elements (e.g., robot hand) - white pixels
- Everything else - black pixels
3. Generate Segmentation
Use the full segmentation map to provide semantic understanding of the scene:
4. Configure Controls
- Edge (0.2): Low weight allows shape changes
- Seg (1.0) + Object Mask: Strong segmentation focused on masked regions
- Vis (0.5): Medium weight balances realism with transformation ability
5. Debugging
- Grasp looks unrealistic → Expand mask around contact points
- Object shape too constrained → Reduce edge weight to 0.1
- Background changing → Increase vis weight to 0.7
For reference, this is the object change prompt:
A first-person point-of-view video from a dual-arm robotic system operating in a research lab. The camera is positioned between the robot's two black, multi-fingered hands, which are visible in the lower corners. The left robotic hand is stationary and is already holding a green bell pepper. On the wooden table in front of the robot, there is an assortment of artificial fruits and vegetables, including two yellow bananas, a bunch of green okra, purple grapes, a green avocado-like object, a grey metal rod, and an orange pear-shaped fruit. The primary action of the video follows the right robotic hand. It starts by moving towards the grey metal rod on the table. The hand's fingers then actuate, closing around the metal rod to grasp it securely. The hand lifts the metal rod off the table and begins moving it towards the right, presumably to place it in a multi-tiered black wire basket that is visible on the right side of the frame and already contains a red apple. The background shows a large, open-plan workshop or lab setting with a gray floor marked by hazard tape, a person sitting at a desk (possibly an operator), other computer workstations, and various pieces of equipment.
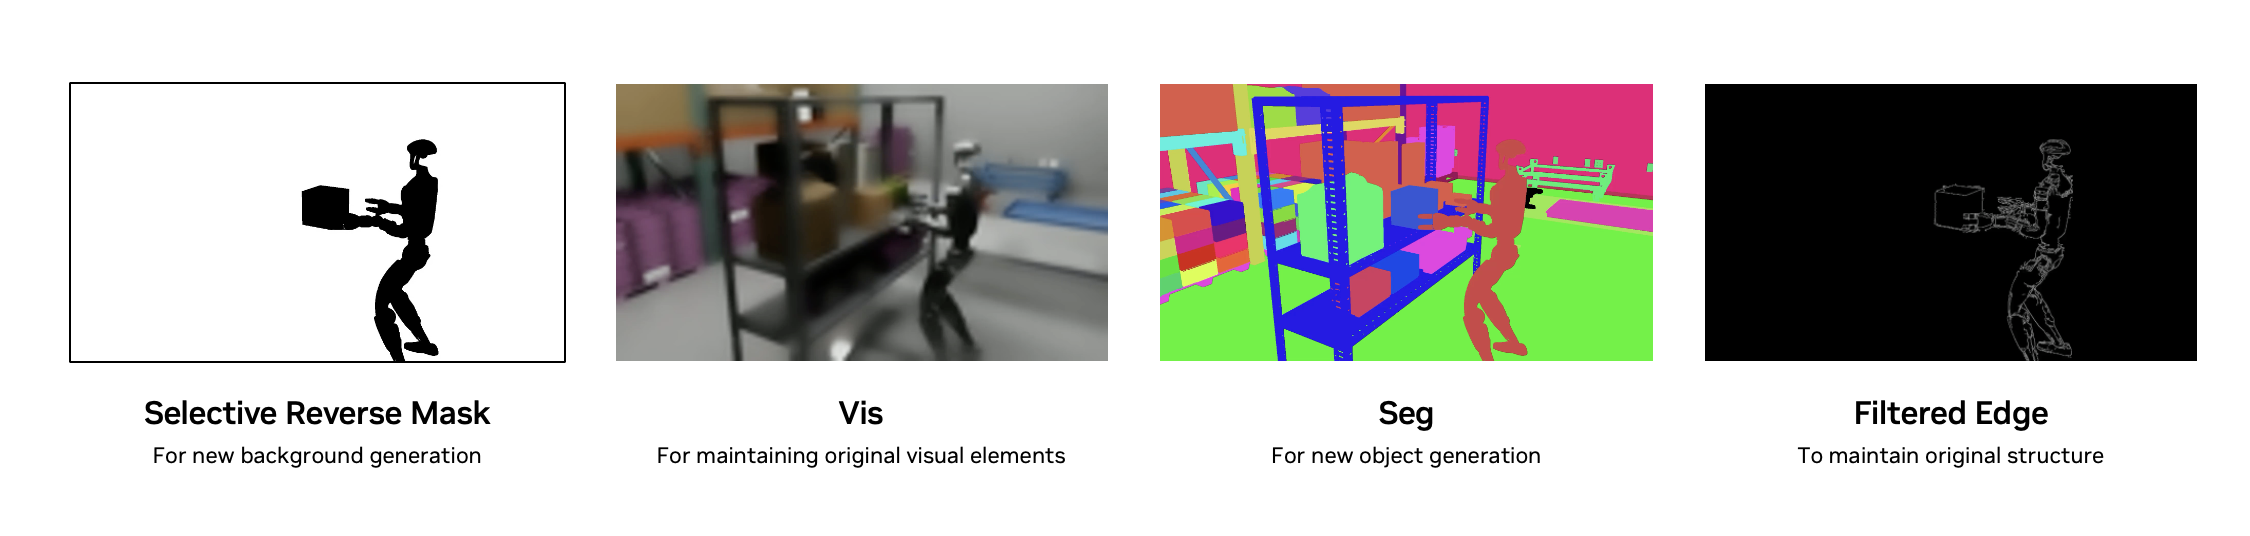
Additional Modality Generation
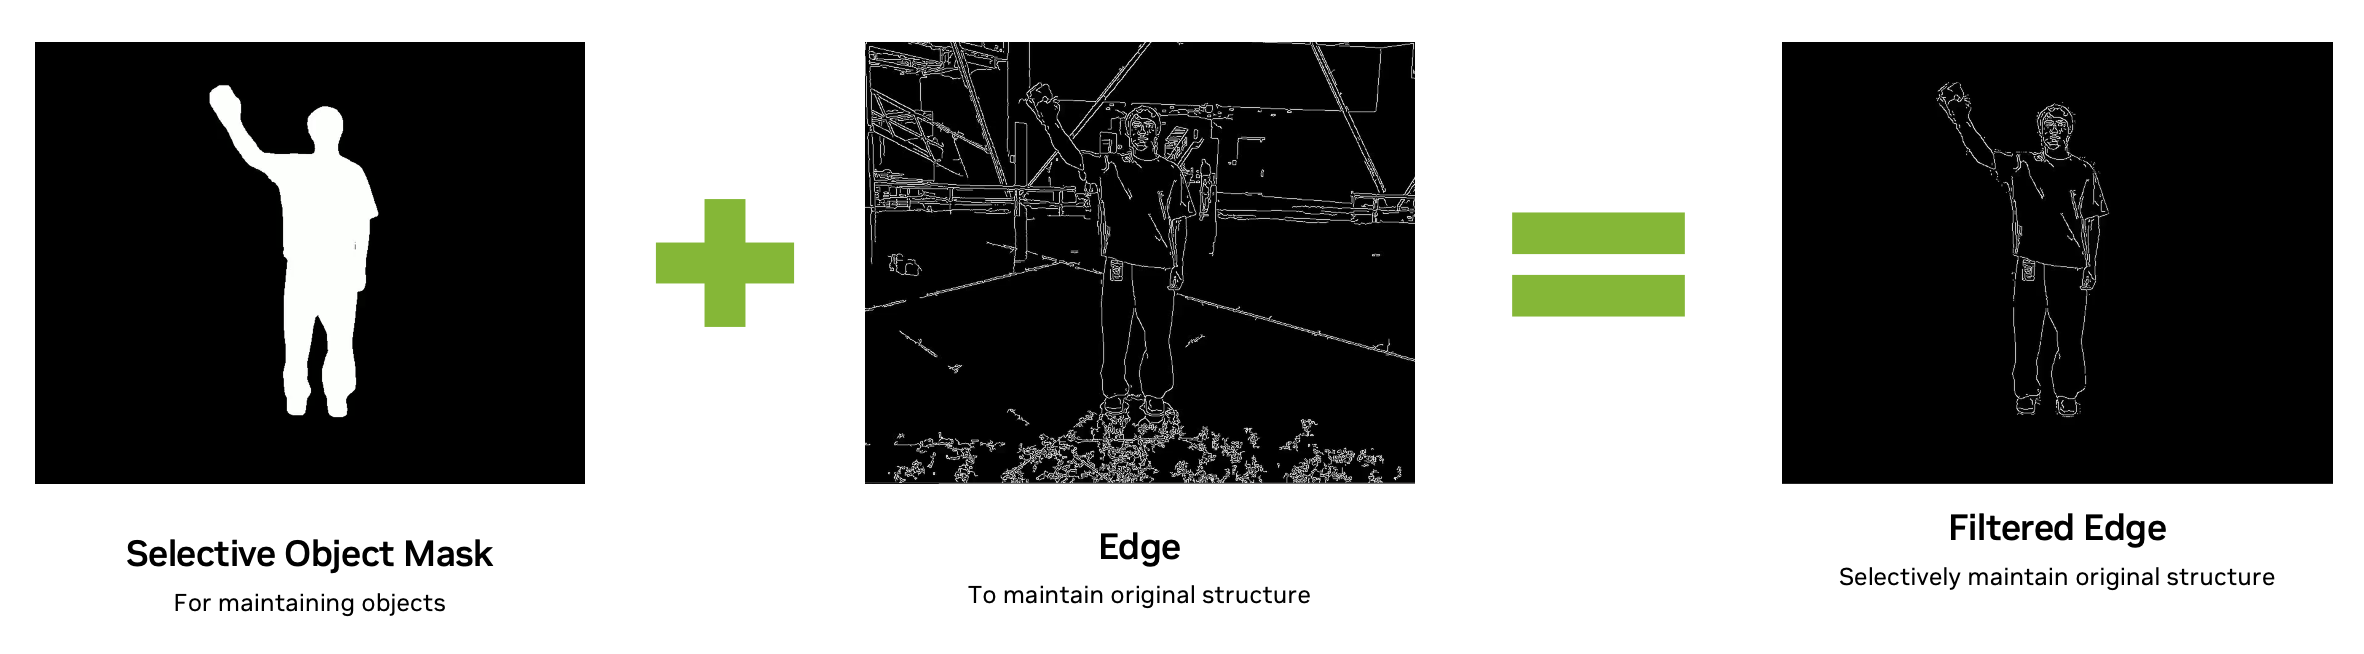
Generating a Filtered Edge
In practice, we’ve found that pre-filtering the edge modality with a mask produces more reliable results than passing a mask_path directly to the model. Performing this as a preprocessing step gives you cleaner, more controllable edge signals.
To generate a filtered edge video, we simply combine the mask video with the raw edge video. The process is:
Generating an Inverted Mask
To create an inverted mask (where white becomes black and vice-versa), we simply apply a color inversion to the original mask video. This can be done quickly with ffmpeg:
Generating a more detailed edge control modality
When object and background contours are too similar, edges may not be detected reliably. In these cases, increasing the brightness and contrast of the video before running Canny edge detection can help produce a more detailed and stable edge map.
Generating Realistic Data from Omniverse
An important robotics workflow is "Sim-to-Real." NVIDIA Omniverse can generate synthetic data, but we can use CT 2.5 to add real-world domain randomization (new lighting, textures, backgrounds) and generate photorealistic scenes. Here's some documentation to get started with IsaacSim, which is built on top of NVIDIA Omniverse.
The Workflow:
- Generate in Omniverse: Create a base scenario (e.g., robot picking a block) and export the video.
- Extract Ground Truth: From Omniverse, also export the perfect ground-truth modalities (Depth, Segmentation, Edge).
- Augment with CT 2.5: Use these perfect synthetic controls to run CT 2.5 with a new prompt (e.g., "in a dimly lit warehouse").
- Package with Cosmos Writer: Save the new, augmented video alongside the original, ground-truth controls. This teaches a downstream model to associate the ground-truth controls with the new, realistic style.
| Task | Suggested Controls & Settings |
|---|---|
| Photorealistic Generation | Edge: 1.0 + Seg (Mask Prompt): 0.9 + Depth: 0.9, Guidance: 7 |
| Creating a realistic background | Filtered Edge: 1.0 + Seg (Mask Inverted): 0.6 + vis: 0.2, Guidance: 3 |
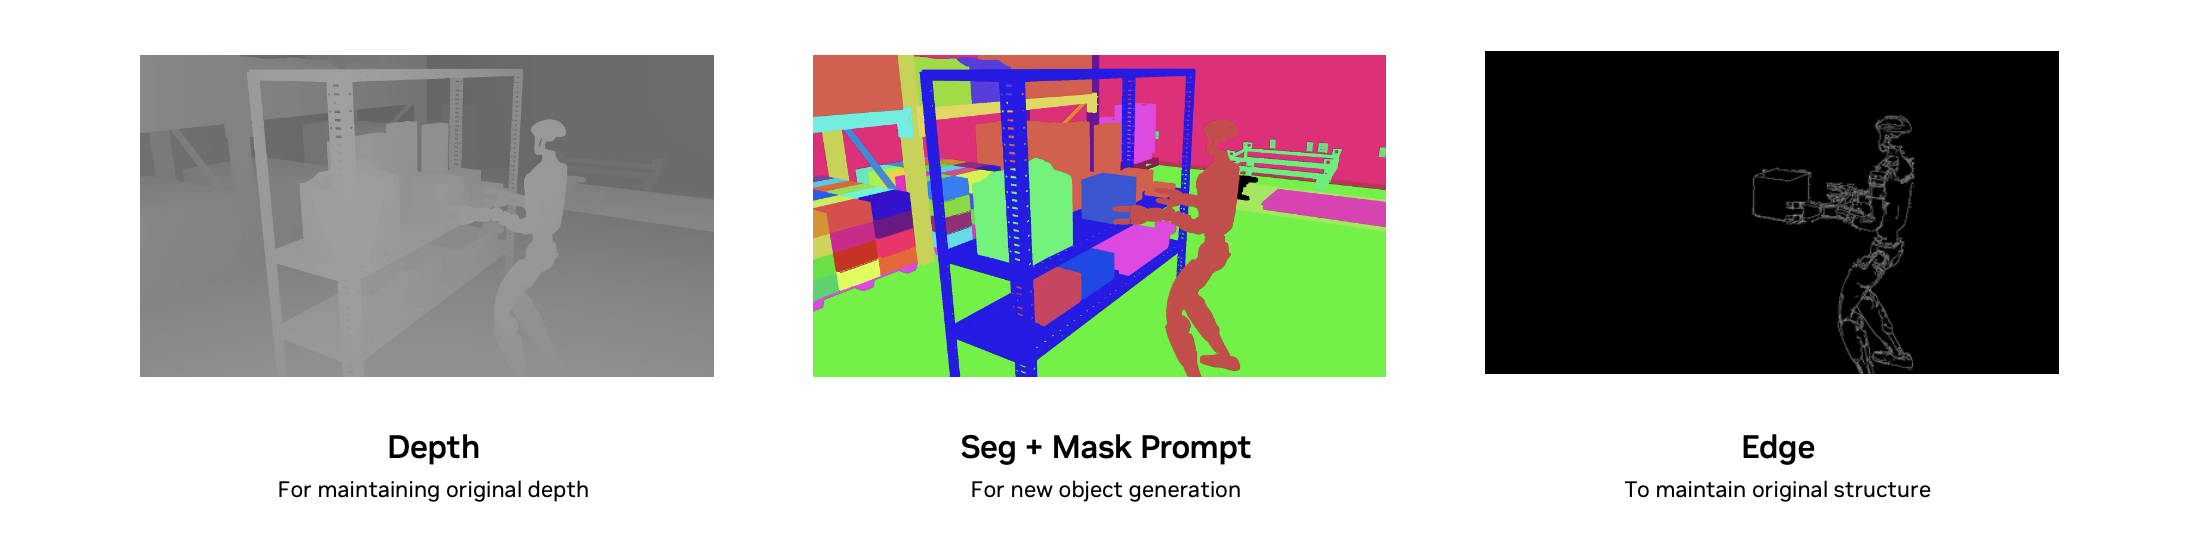
Omniverse Control Modalities
From the previous excersize, we learned how to extract the control modalities from Omniverse. We start with the following control modalities:
| Original Video | Edge | Seg | Mask |
|---|---|---|---|
Photorealistic Generation
Let us change our simulated environment to look realistic
{
"name": "omniverse_photorealistic",
"prompt_path": "prompt.txt",
"video_path": "original.mp4",
"guidance": 7,
"edge": {
"control_weight": 1.0,
"control_path": "edges.mp4"
},
"seg": {
"control_weight": 0.9,
"control_path": "segmentation.mp4",
"mask_prompt": "battered orange safety cone"
},
"depth": {
"control_weight": 0.9,
"control_path": "segmentation.mp4",
"mask_path": "mask_inverted.mp4"
}
}
Recipe
For reference, this is the prompt:
A humanoid robot walks over to a box and grabs it with its grippers. The warehouse is lit by warm sunlight filtering through windows behind the camera. The floor is beautiful rich walnut flooring. The robot is made of brushed aluminium. Some green boxes are stacked on the left side of the warehouse. Everything in the warehouse is well organized and tidy.
Photorealistic Generation Results
| Original | Background Changed |
|---|---|
Creating a Realistic Background
Lets now modify the background with the following configuration
{
  "name": "omniverse_change_background",
  "prompt_path": "prompt.txt",
  "video_path": "original.mp4",
  "guidance": 3,
  "edge": {
    "control_weight": 1.0,
    "control_path": "filtered_edge.mp4"
  },
  "seg": {
    "control_weight": 0.6,
    "control_path": "segmentation.mp4",
    "mask_path": "mask_inverted.mp4"
  }
}
Recipe
For reference, this is the prompt:
In this video, a humanoid robot stands on a busy street sidewalk, approaching a red box on a small metal stand amid storefronts, street signs, and warm sunlight reflecting off nearby buildings.
OV Background Generation Results
| Original | Background Changed |
|---|---|
Resources
- Cosmos Transfer 2.5 Model - Model weights and documentation.
- Control Modalities Summary - Summary of the role of each control modality.
- You can experiment with these recipes and customize them for your own videos using this Brev instance. It comes fully pre-configured and will automatically provision the necessary compute so you can get started right away.
Document Information
Publication Date: November 09, 2025
Citation
If you use this recipe or reference this work, please cite it as:
@misc{cosmos_cookbook_multicontrol_recipes_with_2025,
  title={Multi-Control Recipes with Cosmos Transfer 2.5},
  author={Chang, Aiden and Santhosh, Akul},
  year={2025},
  month={November},
  howpublished={\url{https://nvidia-cosmos.github.io/cosmos-cookbook/recipes/inference/transfer2_5/inference-real-augmentation/inference.html}},
  note={NVIDIA Cosmos Cookbook}
}
Suggested text citation:
Aiden Chang, & Akul Santhosh (2025). Multi-Control Recipes with Cosmos Transfer 2.5. In NVIDIA Cosmos Cookbook. Accessible at https://nvidia-cosmos.github.io/cosmos-cookbook/recipes/inference/transfer2_5/inference-real-augmentation/inference.html